Introduction
This document describes how to install Melodic platform on one machine, from scratch.
Prerequisites
Requirements for Melodic’s machine
OS: Ubuntu 16.04/18.04
RAM: 64GB+
Storage: 100GB+
Following ports accessible:
| Port | Protocol | Component | Purpose |
|---|---|---|---|
| 22 | TCP | ssh | Console |
| 80 | TCP | UI frontend | Melod UI frontend |
| 443 | TCP | UI frontend | Melod UI frontend SSL |
| 8088 | TCP | ESB | REST API |
| 8095 | TCP | Camunda UI | Process UI |
| 8181 8998 7077 38000 38100 38200 38300 38400 38500 | TCP | Spark | Spark components |
| 8080 | TCP | UI | Cloudiator’s webinterface |
| 4001 | TCP | Lance | etc registry |
| 9000 | TCP | Cloudiator | Cloudiator’s REST API |
| 33034 | TCP | Lance | Cloudiator rmi registry |
| 61610-61619 | TCP | EMS | ActiveMQ event broker ports |
| 2222 | TCP | EMS | Baguette server port |
| 1099 | TCP | EMS | ActiveMQ JMX connector port |
| 8111 | TCP | EMS | REST API of EMS |
| 8078 | TCP | UI backend | Melodic UI backend |
| 2036 | TCP | CDO Server | CDO Server |
| 3077 | TCP | JWT | JWT |
| 2121 | TCP | webssh | webssh |
| 3000 | TCP | Grafana | |
| 8123 | TCP | mq-http-adapter/UI | (optional, if diagnosis endpoint is used) |
Installation steps
Full installation includes installing of both: Upperware and the Executionware components of Melodic platform.
Installation instructions
- SSH login into machine (ubuntu 16.04/18.04)
Run the following commands (this will download installation files):
git clone https://bitbucket.7bulls.eu/scm/mel/utils.git(optional) To use integration (non-stable, newest changes) version of Melodic checkout the rc3.0 branch:
⚠️ skip this step if you need the STABLE versioncd ~/utilsgit checkout rc3.0Run the Melodic’s installation script:
sudo ~/utils/melodic_installation/installMelodic.shAfter installation new “.profile” is created in home dir of the user. Load it by executing the following:
cd ~/. .profileNow the machine is ready to download and run latest docker images from Melodic and Cloudiator artifact repository. To download and start the components simply use the following:
drestartRunning this for the first time can take some more time as docker swarm is being initialised. After the above command components shoud be started. You can check the status by running the following 2 commands:
dpsmping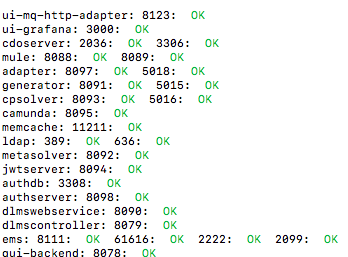
False-negative NOKs
If you experience mping printing NOKs even if everything is up an running please consider [How to] Extended connection test script for VMs.
In order to managing of Melodic’c users, please configure ldap policy and create new ldap user. For the convenience there is simple script packaged with the Melodic allowing to configure ldap and add a user with admin permissions by the following commands:
cd ~/utils/melodic_installation/./configureLdap.sh- You need to add gui-backend self-signed certificate to trusted certificates in your browser. (ATTENTION: Execution of this point is required after each changes of Melodic IP, e.g. after each running of ‘ipupdate’ command). The easiest way:
- open https://{PUBLIC_MELODIC_IP}:8078 in your browser
- confirm the security exception
- Login to GUI on https://{{PUBLIC_MELODIC_IP}}
- by the first usage of Melodic machine with new public IP in your browser, you need to confirm the security exception
- Go to Provider settings and update your Cloud credentials
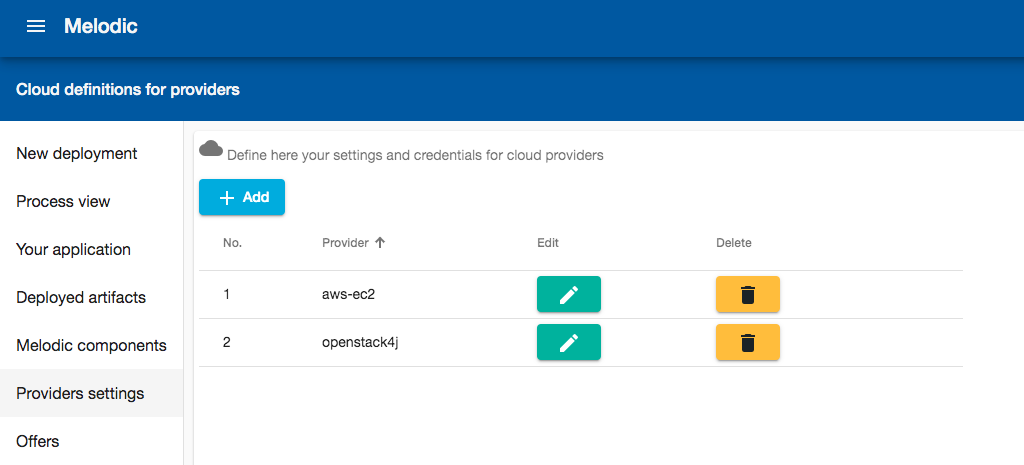
- Now this machine should be ready for deploying some application.
GUI should be available under: {PUBLIC_MELODIC_IP} (log in with your ldap credentials)
Process GUI is present in UI and http://{PUBLIC_MELODIC_IP}:8095 (log in with your ldap credentials)
Usefull aliases
Below you can find usefull commands to manage melodic components:
dps – displays docker containers running (alias for sudo docker images)
mping – tests connection to each of the commponents
drestart – stops and then starts all of the Melodic’s components
dundeploy – stops all of the components
ddeploy – starts all of the components
ipupdate – updates cloudiator’s and upperware’s env files with current IP of the machine – useful when the IP of the machine changes