This part of the guidebook provides the details of the MELODIC architecture and explains how the platform can be built, installed or extended. It targets advanced users that would like to set-up, configure or even improve the Melodic platform.
1a. MELODIC Concepts and Architecture (SRL)
The Upperware: The Upperware can be termed as the brain of the Melodic platform. It has components that deal with finding optimal solution for the cross-cloud application and data placement problem, according to the user-defined requirements and in consideration of the current workload situation and involved costs.
The Executionware: The Executionware enables orchestration and monitoring of cross-cloud resources by providing abstract interfaces to various cloud platform APIs and tools.
The Modelling and Interfacing Tools: The modelling and interfacing tools include tools for data modelling, application modelling, and user-platform interactions. All user requirements are captured using a domain-specific language, CAMEL, which encapsulates all relevant aspects required for modelling data-intensive applications and their configurations in heterogeneous Cross-Cloud environments. The user-platform interaction is supported both in terms of platform APIs and web-based UI.
Each of the Melodic modules is conceptually divided further into components. The Melodic components interact with each other through well-defined interfaces encapsulated over two separate integration layers: the Control Plane and the Monitoring Services. Melodic’s implementation of the Control Plane is based on an Enterprise Service Bus (ESB) architecture with process orchestration through Business Process Management (BPM). The ESB architecture utilizes a centralized bus for message propagation between components. Components publish messages to the ESB, which are then forwarded to all subscribing components. BPM orchestration is used to orchestrate invocation of methods from underlying Melodic components. The Monitoring Services involve a secure complex event processing framework for efficiently aggregating and processing highly distributed monitoring data.
A Feed-back driven Adaptation Loop: At the heart of the Melodic platform lies a feedback-driven adaptation loop that ensures that application deployments are continuously monitored, analyzed, and reconfigured, if needed, to ensure that the user-defined constraints and requirements are optimally satisfied for a given cross-cloud application. The interaction of the Melodic modules to realize this adaptation loop is shown in the figure below.
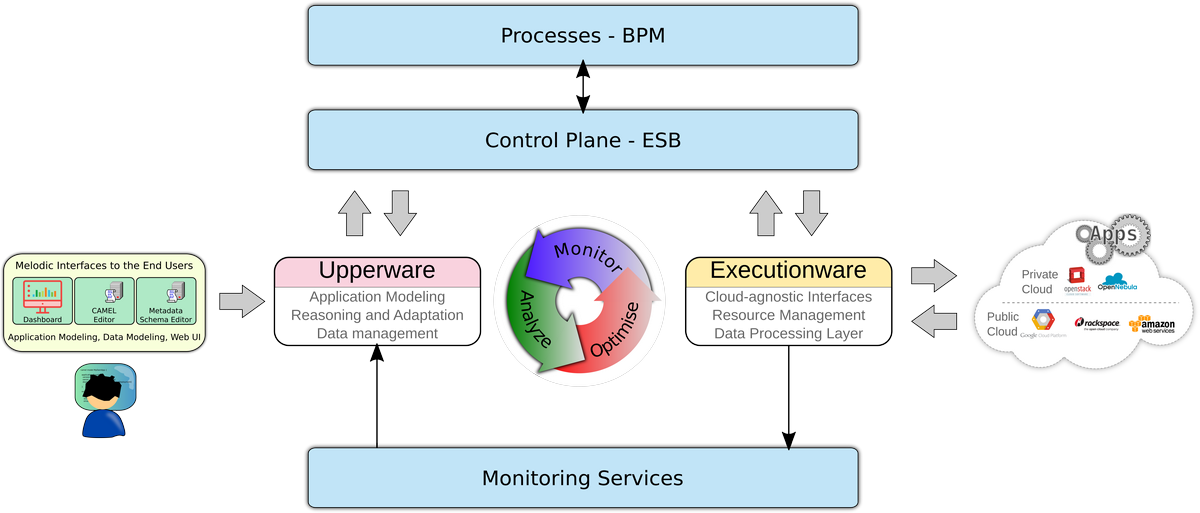
As depicted in the figure, the user requirements and constraints, related to both applications and data, are captured using CAMEL. The Upperware takes CAMEL model as an input and calculates the optimal data placements and application deployments on aggregated cross-cloud resources in accordance with the specified application and data models in CAMEL. The actual cloud deployments are carried out through the Executionware.
The Upperware: A high-level overview of the Upperware components is shown in the figure below. The Upperware workflow is involved in both finding an optimal initial placement topology for the cloud applications on the appropriates cloud resources, as well as keeping the deployed solution optimized based on the collected monitoring data.
The user-defined application and data model is given to the Upperware in the form of CAMEL. Then, a series of Upperware components are involved in finding an optimal deployment solution, as well as adapting the cloud resource deployments for an application. The process begins with generating a Constraint Programming (CP) model that is processed and solved by Melodic’s Solvers. As Melodic’s approach is based on the utility-based optimization, a dedicated Utility Generator is used to evaluate different candidate solutions that each solver may suggest. The utility is based on a user-defined utility function that also integrates the utility value calculated by the Data Lifecycle Management System (DLMS). The DLMS employs various data-aware algorithms that takes data aspects of the application deployments in consideration when calculating the utility. Finally, the Adapter component analyzes and validates the calculated deployment model, and defines the particular reconfiguration action tasks to be executed in a specific order by the Executionware in order to implement the optimized deployment configuration for the current execution context found by the solvers.
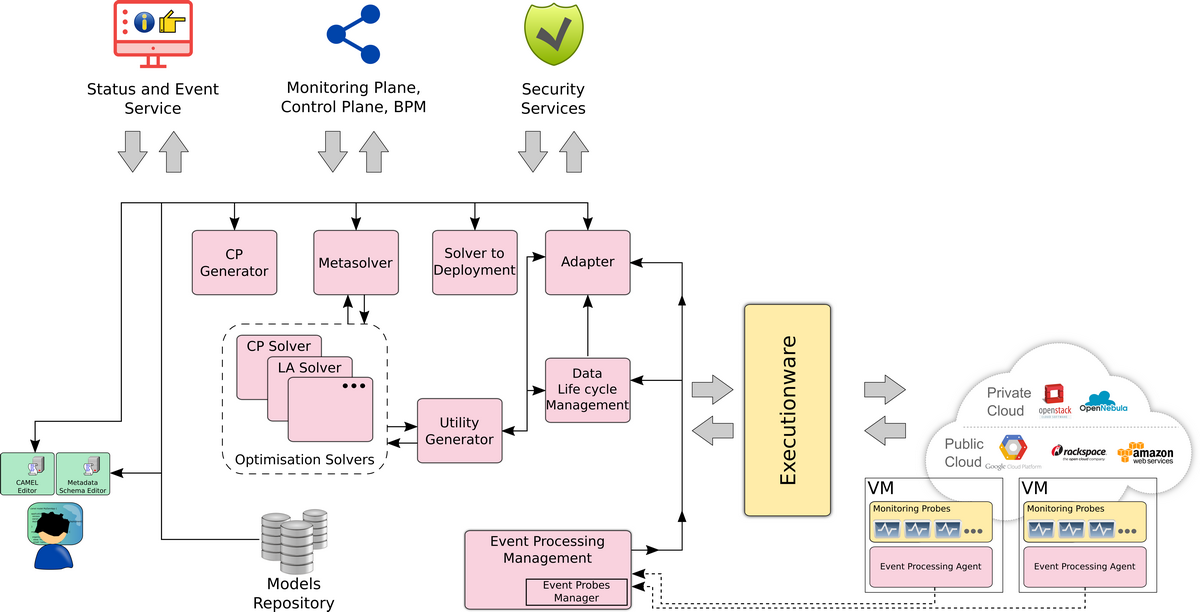
The Executionware: The main jobs of the Executionware are the management of diverse cloud resources in a provider-agnostic way, the orchestration of data intensive applications on top of these cloud resources, and the deployment of the monitoring services to collect run-time metrics. The Melodic Upperware interacts with the Executionware in order to deploy data intensive applications, specified in the user-supplied CAMEL application model, to the Cloud.
The core functionality of the Executionware is built upon the cloud orchestration tool, called Cloudiator. A high-level view on the Executionware components and its interaction is depicted in figure below. Besides Monitoring Services, which are integrated with the Monitoring Services of the Upperware, the Executionware also includes a holistic Resource Management Framework and a Data Processing Layer to enable orchestration and management of Big Data processing frameworks and user jobs on the cross-cloud resources.
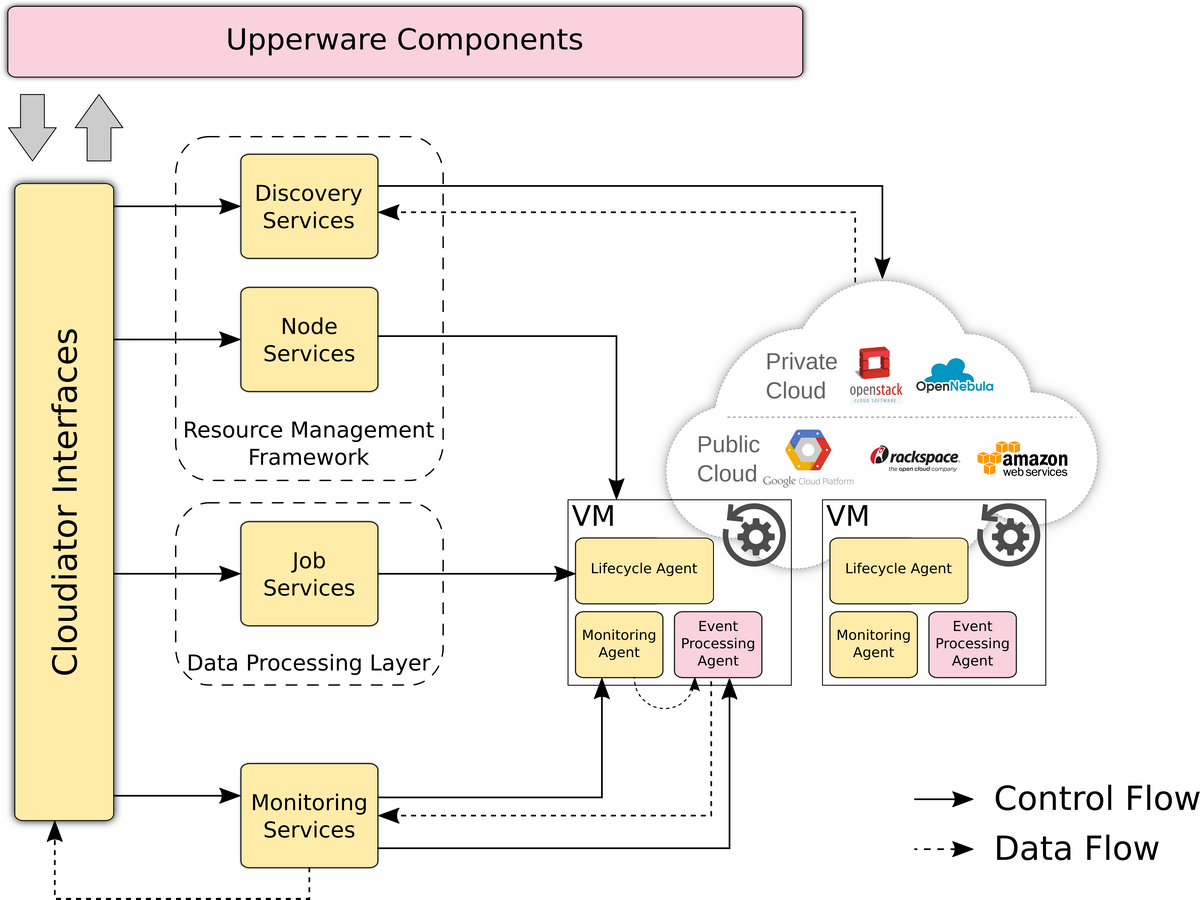
The Melodic Interfaces to the End-Users: For modelling Cloud applications and data, the Melodic’s users use CAMEL language, which is a DSL developed across several cloud projects and extended in the Melodic. For modelling applications and data, two CAMEL editors are available, a textual CAMEL editor and a web-based CAMEL editor. The textual CAMEL editor is based on Eclipse IDE and allows Create-Read-Update-Delete (CRUD) operations over the main CAMEL elements for describing, among others, the decomposition of the Cloud application into its components and for defining placement and scalability requirements that follow the required service level objectives (SLOs). Moreover, data sets are also modeled via the same editor.
Melodic also supported the capability to extend CAMEL according to the requirements of the Melodic adopters, based on the Metadata Schema. The CAMEL metadata schema constitutes a formal way for defining extensions in CAMEL.
The Melodic platform also provides a web-based UI, which enables easy application deployments and monitoring.
1b. MELODIC Build and install
The section contains a detailed description of the MELODIC platform and additional tools installation.
MELODIC PLATFORM installation
Melodic installation procedure could be found here
CAMEL Textual Editor
As indicated in section 2-b3, CAMEL involves a textual editor that is currently promoted as it fits devops preferences. In this respect, we supply here guidelines on how to install CAMEL’s textual editor in an Eclipse Environment (mapping to the Eclipse oxygen version). This is a standalone installation irrespectively of the place where the MELODIC platform is installed.
This tutorial describes how to install the Eclipse oxygen-based Camel editor.
- install the Eclipse – oxygen version, for example “Eclipse IDE for JAVA Developers version” (follow instructions on: http://www.eclipse.org/downloads/download.php?file=/technology/epp/downloads/release/oxygen/3a/)
- inside the Eclipse , choose help-> install new software
- choose Oxygen – http://download.eclipse.org/releases/oxygen
- choose the following plugins:
- EMF – Eclipse Modeling Framework SDK 2.13.0.v20170609-0928
- EMF Parsley CDO 1.2.3.v20180220-1246
- OCL Classic SDK: Ecore/UML Parsers,Evaluator,Edit 5.3.0.v20170607-1133
- install more plugins:
- OCL Examples and Editors SDK 6.3.0.v20170613-1432
- Xtext Complete SDK 2.12.0.v20170519-1412
- and more:
- CDO Model Repository SDK 4.6.0.v20170602-1611
- Download camel folder from Bitbucket (branch: rc2.5): https://bitbucket.7bulls.eu/projects/MEL/repos/camel/browse/camel?at=refs%2Fheads%2Frc2.5
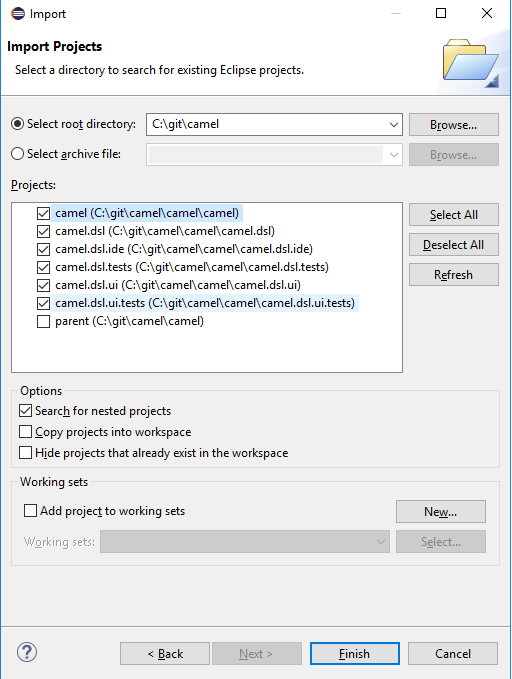
- Import camel projects into the eclipse workspace
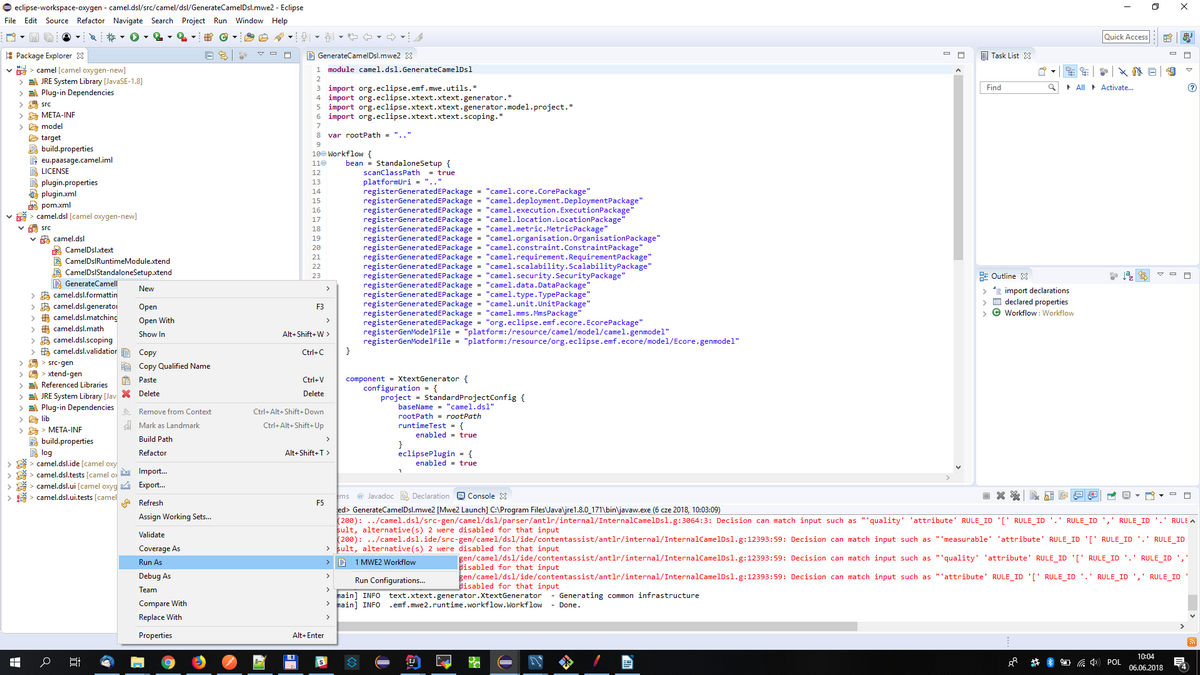
- generate mwe2 flow ( right click on GenerateCamelDsl.mwe2 under src/camel/dsl and then runas->MWE2 workflow)
Running the textual editor:
- right click on camel.dsl project and run as -> eclipse application
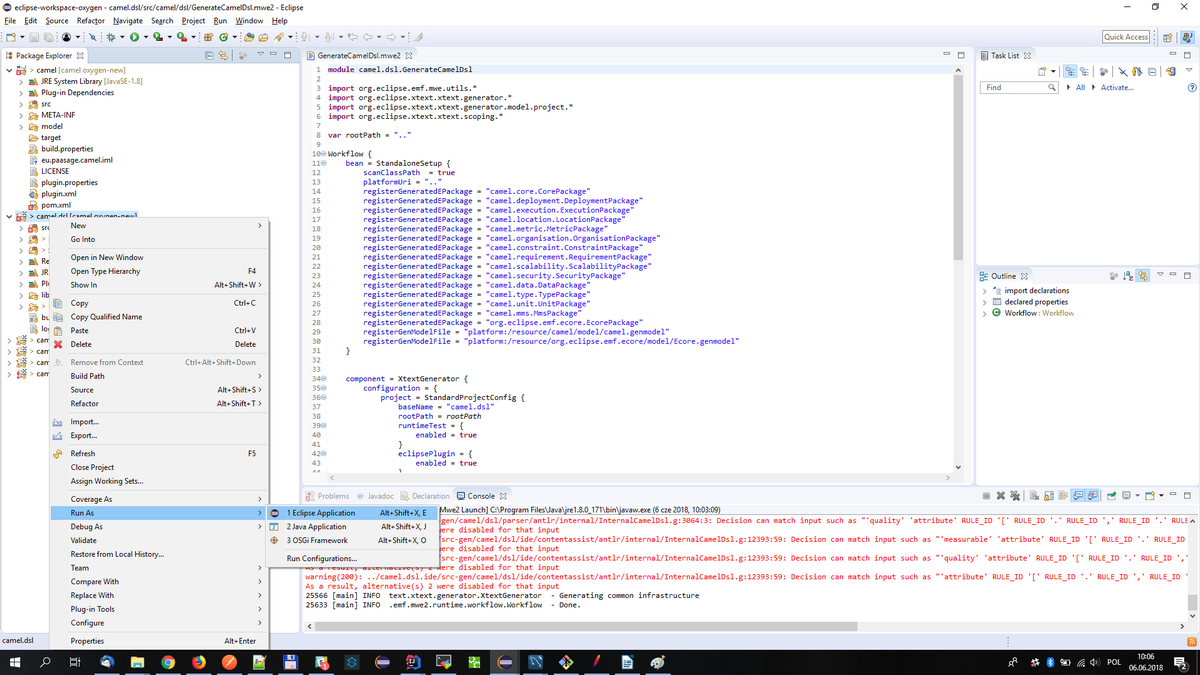
- create general project (just once) and put .camel files inside
- copy MMS.camel, location.camel, metric.camel & unit.camel files (from camel repository->examples) to the workspace (this enables to insert Metadata Schema annotations in the CAMEL model as well as re-use metric, unit & value type elements from the three latter template models)
- open camel file (for the first time it will ask to enable xtext nature – just agree and remember the decision)
- after editing and saving .camel file the .xmi file should be generated under src-gen folder
Alternative Execution
Once the first execution alternative is followed, you can open the Debug view (Window→Show View→Other→Debug→Debug).
There, in the opened view, you actually see the command that is being executed. You can just right click on it and select Properties.
This will unveil the actual command string. You can then just copy and paste it, e.g., in a certain executable file like run.bat for Windows.
Then, you can just stop the previous execution and use the respective executable file to launch the editor from now on without having to run a priori any (graphical) Eclipse Environment.
This can certainly enable to save a lot of main memory space.
Note: this command is workspace-specific so this is the reason that requires first to create the right workspace and have the right Eclipse plugins installed as well as the CAMEL ones.
1c. Extending MELODIC / Plug in your mechanisms
The MELODIC platform is an advanced autonomous middleware that acts as an automatic DevOps for cloud applications, able to make the appropriate adaptations to the deployment configuration as the application’s context changes.
In MELODIC the application details, its components, the data sets to be processed, and the available monitoring sensors can all be described in a Domain Specific Language (DSL). The application architecture description is coupled with the goals for the deployment, the given deployment constraints, and monitoring information to allow the MELODIC platform to continuously optimize the deployment. Therefore, MELODIC follows the models@runtime paradigm.
The MELODIC architecture has the following main layers:
- The application modelling based on the the Cloud Application Modelling and Execution Language (CAMEL);
- The Upperware solving the optimization problem and adapting the deployment model;
- The Executionware based on the Cloudiator cross-Cloud orchestration tool responsible for the deployment of the solution decided by the Upperware.
For integration purposes a professional ESB (Enterprise Service Bus) is used, based on MuleSoft ESB (community edition). For the business logic and service orchestration, the BPM solution based on Camunda BPI is used. Based on these architectural choices, it is quite straight forward to extend the MELODIC platform by adding new components and configuring the proper logic flow updating the BPM process.
The MELODIC architecture is presented in the figure below.
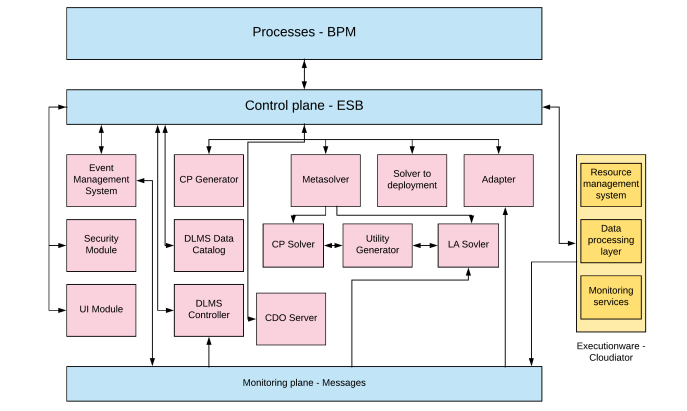
Integrating components from different development teams into MELODIC platform makes it mandatory to cater for high availability and reliability. It is important to ensure a reliable flow of the invoked operations, guarantying full control over an operation’s execution. It must, therefore, provide unified exception handling and retries of operations. This requires the ability to monitor all operations invoked on the integration layer, with a configurable level of detail, and configurable and easy usage of a single logging mechanism for all the invoked operations. The integration framework selected for MELODIC platform supports flexible orchestration by the ability to easily set up and reconfigure the orchestration of method invocations for any of the underlying components. It is possible to configure such orchestration without the need to code and recompile the whole platform every time an extension takes place. This implies that the MELODIC framework has support for the most commonly used integration protocols: Simple Object Access Protocol (SOAP), Representational State Transfer (REST) and the Java Messaging Service (JMS). It also supports both synchronous and asynchronous communication methods with an easy way to switch from one to the other. Also, it has the ability to perform complex data model transformations.
This part of the guide offers an introduction to the MELODIC scope and provides valuable information about how multicloud applications can be modeled and managed through the MELODIC platform. It mainly targets adopters from the industry.
2a.Introduction/Scope of the Platform
MELODIC offers cloud agnostic and optimized management of multicloud applications. It is an open-source platform developed in terms of the H2020 MELODIC project. The MELODIC platform enables and optimizes data-intensive applications to run within defined cost, security and performance boundaries seamlessly on geographically distributed and federated cloud infrastructures. The Melodic platform has a modular architecture with three main component groups as described below.
The Upperware: The Upperware can be termed as the brain of the Melodic platform. It has components that deal with finding optimal solution for the cross-cloud application and data placement problem, according to the user-defined requirements and in consideration of the current workload situation and involved costs.
The Executionware: The Executionware enables orchestration and monitoring of cross-cloud resources by providing abstract interfaces to various cloud platform APIs and tools.
The Modelling and Interfacing Tools: The modelling and interfacing tools include tools for data modelling, application modelling, and user-platform interactions. All user requirements are captured using a domain-specific language, CAMEL, which encapsulates all relevant aspects required for modelling data-intensive applications and their configurations in heterogeneous cross-cloud environments. The user-platform interaction is supported both in terms of platform APIs and web-based UI.
At the heart of the Melodic platform lies a feedback-driven adaptation loop that ensures that application deployments are continuously monitored, analyzed, and reconfigured, if needed, to ensure that the user-defined constraints and requirements are optimally satisfied for a given cross-cloud application. The interaction of the Melodic modules to realize this adaptation loop is shown in the figure below.

To adopt the Melodic platform for your multicloud application needs, you need to capture the details of your application (section 2b) and its respective constraints and optimisation goals using the CAMEL language. Next, you need to follow a number of simple steps for starting the initial deployment and management of your application by MELODIC. Along with these concrete instructions you may find an illustrative walkthrough that highlights the use of MELODIC in a real use case demonstrator.
2b. MELODIC Modelling
This section covers all the necessary steps that a MELODIC adopter needs to follow for adequately describing the multi-cloud application that should be deployed and managed by the MELODIC platform. MELODIC follows a Model-driven Engineering (MDE) approach, which means that before a given data-intensive application and its corresponding data sources are ready to be deployed by the Melodic platform across a number of infrastructural resources, it needs first to be modeled, so that deployment requirements and constraints can be formally specified, and hence utilized by the deployment reasoning process. For this purpose a domain specific language (DSL) is used, i.e. the Cloud Application Modelling and Execution Language (CAMEL). In addition, MELODIC has introduced a Metadata Schema for data-aware multi-cloud computing. Its objective is to aid the data management, access control, and data-aware application design for distributed and loosely-coupled multi-cloud applications. It introduces the terminology and vocabulary aspects of metadata that can be used for extending the CAMEL language if needed.
Specifically, this section of the guidebook intends to familiarize the potential adopter with the way that:
- cloud providers’ credentials can be securely registered or updated;
- the Melodic Metadata Schema can be updated (if needed);
- an application should be modeled using CAMEL language.
2b-1. How to securely register/update your Cloud Providers credentials
The MELODIC platform allows for secure registration and updating of cloud computing providers’ credentials. As MELODIC is designed to operate with multiple cloud providers to allow for multicloud deployments, it is very important to provide secure storage for cloud providers’ credentials. That is the reason that MELODIC provide highly secure method to store such data. It is done through MELODIC UI as presented in the picture below. Cloud Credentials are stored using a secure, encrypted store.

After clicking the option marked in Figure above, an additional form is opened. The cloud computing providers details should be provided through the web form. Next, this sensitive data are stored in an encrypted way and retrieved every time a new deployment or a reconfiguration should be implemented.
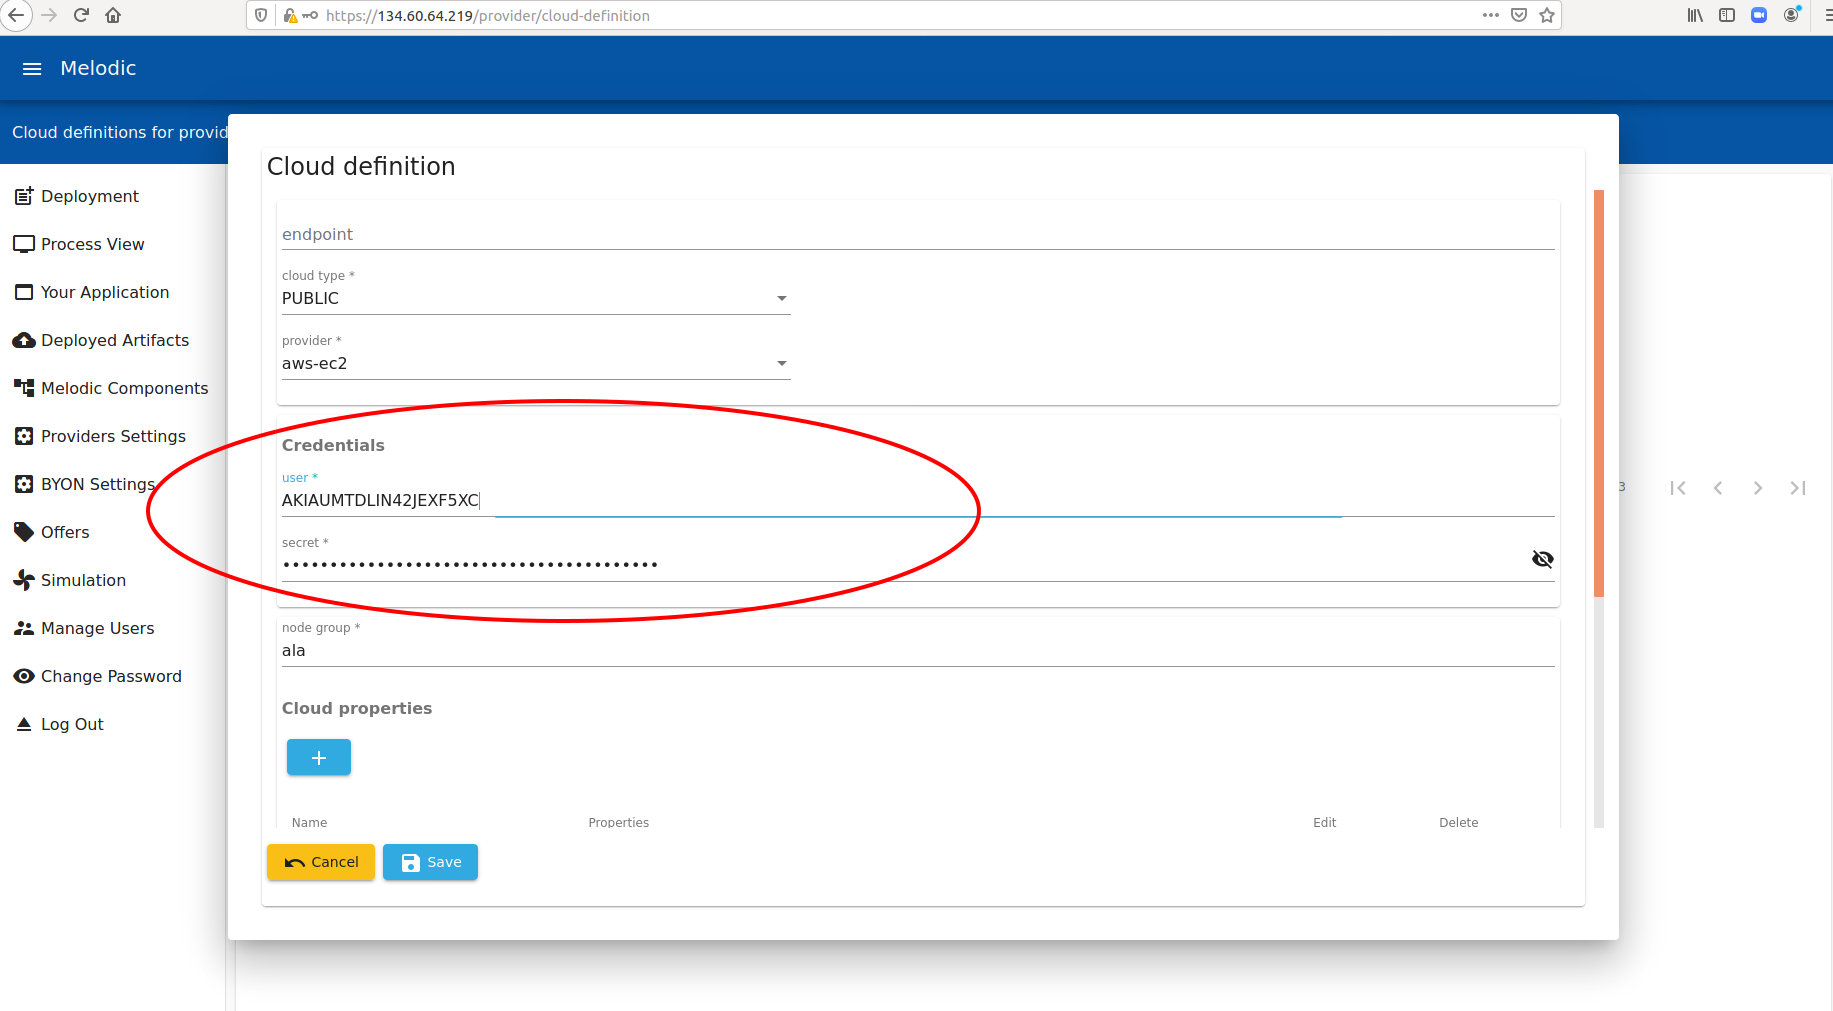
It is also possible to provide cloud computing providers credentials before each deployment, to avoid storing that in MELODIC platform (for the highly secure systems).
2b-2. How to update the Melodic Metadata Schema
Melodic’s Metadata Schema provides a vocabulary though a hierarchical structure of all the concepts (represented as lexical terms) that are relevant for describing cloud application requirements, big data aspects and characteristics (with respect to the input and output of these applications) and the offered cloud infrastructure capabilities for discovering optimised multi-clouds placement opportunities. In addition, it encapsulates all the necessary concepts for enabling the context-aware authorization functions that the Melodic platform supports. The Metadata Schema comprises the Application Placement, Big Data and Context Aware Security models that group a number of classes and properties to be used for defining where a certain big data application should be placed; what are the unique characteristics of the data artefacts that needs to be processed; and what are the contextual aspects that may be used for restricting the access to the sensitive data. For example, if we need to know the geographical location where processing of a certain big-data type will take place, then a relevant geographical processing location concept should be defined, along with its related instances (e.g., EU, GR, ASIA) and properties (e.g., latitude, longitude). This Schema is used for formally extending the CAMEL language if need. Concepts from this Schema potentially affect the Requirement, Metric, Scalability, Location, Provider and Security sub-models of CAMEL. A bird’s eye view of the schema can be found in the following figure, while a detailed mind map for an easier walkthrough of the Schema’s main aspects can be found here: http://melodic.cloud/assets/images/MELODIC_Model_vFinal.png Also, a detailed explanation of all the classes and properties included in this Schema is provided here: https://melodic.cloud/wp-content/uploads/2019/01/D2.4-Metadata-schema.pdf
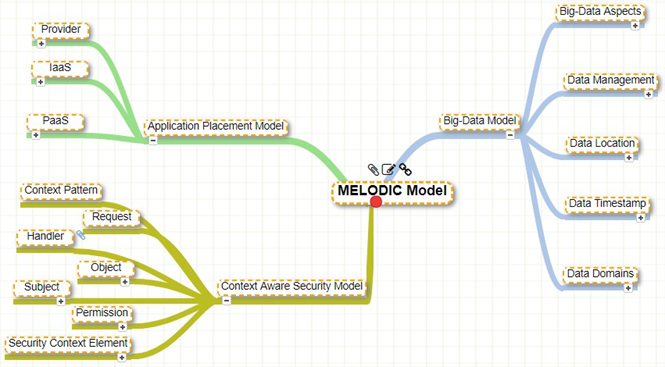
It is expected that the Metadata Schema will be adapted to the specific business and technical requirements of each application of a single organisation. For this purpose, MUSE – a Metadata Schema editor has been developed for creating, updating and maintaining the Metadata Schema. Typically, this task is undertaken by the administrator. Below we show how MUSE can be used.
Initialization
Before using the editor, it is necessary to fetch the Metadata Schema from the Models Repository into the Local datastore. This is achieved by clicking on the “Models repos. → Local repos.” menu item. The menu appears by clicking the hamburger style glyph at the upper left corner of the page as seen in the next Figure that illustrates the editor menu.
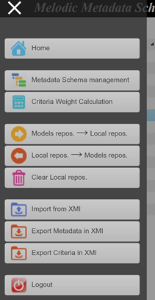
From the menu, the user can also transfer any changes made in the Metadata Schema, from the Local Repository into the Models Repository (menu item “Local repos. → Models repos.”) thus making them visible to the rest of the Melodic components. Other options include emptying the Local Repository (menu item “Clear Local repos.”), exporting Metadata Schema from Models repository (in XMI format), and reversely importing XMI files into the Models Repository.
Updating/Instantiating the Schema
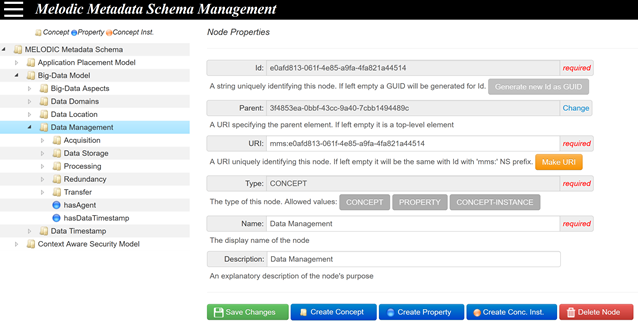
By selecting “Metadata Schema management” from the menu, the Metadata Schema editor web page is loaded (as seen in the next figure). Using the tree-view in the left-hand side of the page, the user can navigate through the Metadata Schema. Concepts are represented with yellow folder icons in the tree view, whereas other artifacts (e.g. concept properties) are represented with coloured balls. By selecting a tree node, its details are loaded into the “Node Properties” form, found in the main area of the page. Furthermore, the form fields change according to the type of the tree node selected (i.e. concept, concept property or concept instance). For example, the Range form field is only available for the concept property nodes. The white text fields can be edited while the grey ones are read-only. At the bottom of the page, there is a row of buttons for creating new nodes (concepts, properties, and instances), deleting the selected node or saving changes in the form.
In the remaining section, a simple use case, where a new sub-concept will be created, is detailed. First, the user selects the “Data management” node in the tree view, as shown in the Figure below. This node will be the (immediate) parent concept of the concept to be added. Upon selection, the parent node’s data are fetched from the Local Repository and are displayed in the “Node Properties” form. Next, the “Create Concept” button must be pressed to start creating the new sub-concept.
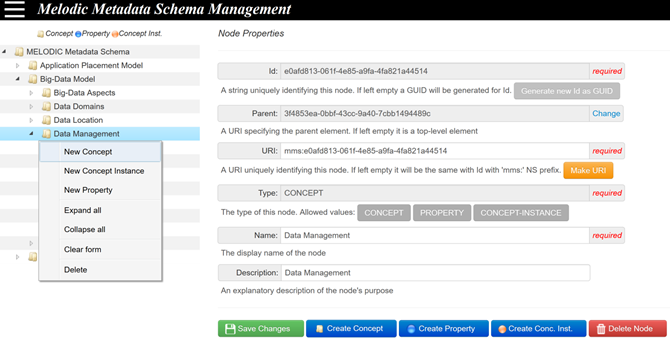
The same functionality is also available through a context popup menu, which is available by right clicking on the parent node, and then clicking the “New Concept” item (as seen in the next Figure).
Both actions (i.e. pressing “Create Concept” or clicking “New Concept” in context popup menu) will make the “Node Properties” form (in the main page area) to adapt in order to include only those fields that are relevant to Concepts (i.e. Id, Parent Id, URI, Type, Name, Description). The values of Id and URI fields are automatically completed, as shown in next Figure.
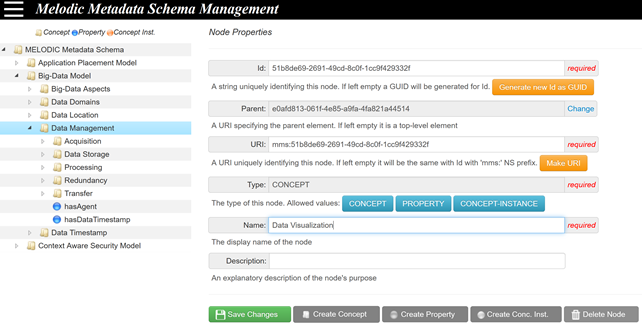
The user can modify Id and URI values if needed, fill-in the new concept’s name, for instance “Data Visualization”, and optionally give a description, in the corresponding fields. Eventually, by pressing the “Save Changes” button, the new sub-concept’s data are submitted to the Local Repository for storing. Afterwards, the tree view is refreshed in order to include the newly added concept.
2b-3. How to model your application using CAMEL
CAMEL is a multi-domain-specific language (multi-DSL) which is specialised in the modelling of multi-cloud applications. It comprises multiple domains which cover information aspects relevant to the multi-cloud application lifecycle. These aspects include deployment, requirement, metric and scalability. CAMEL currently advances the state-of-the-art due to its richness and deepness in the way the various aspects are covered.
CAMEL is accompanied with an editor which can assist in the development and modification of CAMEL models. Specifically, an Eclipse-based textual editor is offered which enables the editing of models that conform to the textual syntax of CAMEL. In this respect, instructions on how to use the CAMEL’s textual editor can be found here: [CAMEL] Camel 2.5 Eclipse (oxygen) editor installation.
As indicated above, CAMEL captures multiple aspects. In fact, a CAMEL model of a user application can be seen as a container of sub-models, each of which maps to one of these aspects. Please note that not all aspects can be edited by users. In particular, the execution aspect is meant to be touched and maintained only by the MELODIC platform. Further, for some aspects, the type-instance pattern is followed. In that case, the user should specify only the relevant aspect-specific models at the type level as the instance level is again maintained by the MELODIC platform (with the sole exception of the data aspect where the user can specify concrete data and data sources (instances) which pre-exist before the execution of his/her application). In this respect, we supply in the next table the following information per each aspect covered by CAMEL: (a) the actual aspect; (b) key concepts from this aspect; (c) a link dedicated to explicating how models pertaining to this aspect can be specified.
| Core | Top model, container of other models, application, attributes | |
| Deployment | Application topology (components with their configuration & communication / placement dependencies) | Deployment Modelling |
| Requirement | Resource, platform, security, location, OS, provider, scaling, QoS (SLOs & optimisation) requirements | Requirements Modelling |
| Metric | Metric, Sensors, Variables, Metric Templates + Mathematical metric/variable formulas | Metric Modelling |
| Constraint | Metric & variable (single) constraints, logical and if-then composite constraints | Modelling of Utility Function and Constraints in Camel Model 2.0 |
| Data | Data & Data sources | Data Modelling |
| Location | Physical and cloud-based locations | Location Modelling |
| Unit | Units of measurements (single, composite, dimensionless), dimensions | Unit Modelling |
| Type | Types (numerical ranges, lists, range unions) & values (int, double, String, boolean) | Value Type Modelling |
| Metadata | Ontology-like structure with concepts as well as data & object properties at type & instance level | Metadata Schema Modelling |
The core aspect is devoted to the modelling of the overall user application as well as of certain attributes and features that could be re-used in respective sub-models. The user application is mainly characterised by its name, a short textual description explaining its semantics as well as its current version. The following snippet showcases the content of a CAMEL model which includes the specification of a certain application. In this model, we also supply the placeholders for other sub-models in order to clarify to the user that each sub-model will cover a corresponding relevant CAMEL aspect.
camel model MyAppModel{ application MyApp{ description ‘My app offers the functionality of …’ version ‘1.0’ } deployment type model MyDepModel{ … } requirement model MyReqModel{ … } metric type model MyMetricModel{ … } scalability model MyScalabilityModel{ … } location model MyLocationModel{ … } unit model MyUnitModel{ … } constraint model MyConstrModel{ … } type model MyTypeModel{ … } data type model MyDataModel{ … } data instance model MyDataInstModel{ … } organisation model MyOrgModel{ … } security model MySeqModel{ … } metadata model MyMDModel{ … } } |
|---|
We conclude this guidebook section through the supply of the respective confluence link (i. Introduction to CAS demonstrator (Sebastian)) which covers the modelling of a certain application in CAMEL mapping to one use case of the MELODIC project. We further supply some information sources (CAMEL Information Sources) that cover additional content related to CAMEL (like detailed documentation plus models of many use cases). Based on all the information supplied in this section, any adopter of the MELODIC platform will be able now to edit his/her own CAMEL models.
2c. MELODIC @Runtime
2c-1. Initial Deployment
- Make sure that your MELODIC instance is ready for the deployment: it is freshly restarted and all components are ready. Please look at Preparation of the Melodic machine after IP change.
- Go to https://{{MELODIC_IP}}
- Log in using your LDAP’s credentials
- Download the chosen CAMEL Model file. The basic example is available here: https://s3-eu-west-1.amazonaws.com/melodic.testing.data/TwoComponentApp.xmi
- Go to the new deployment bookmark
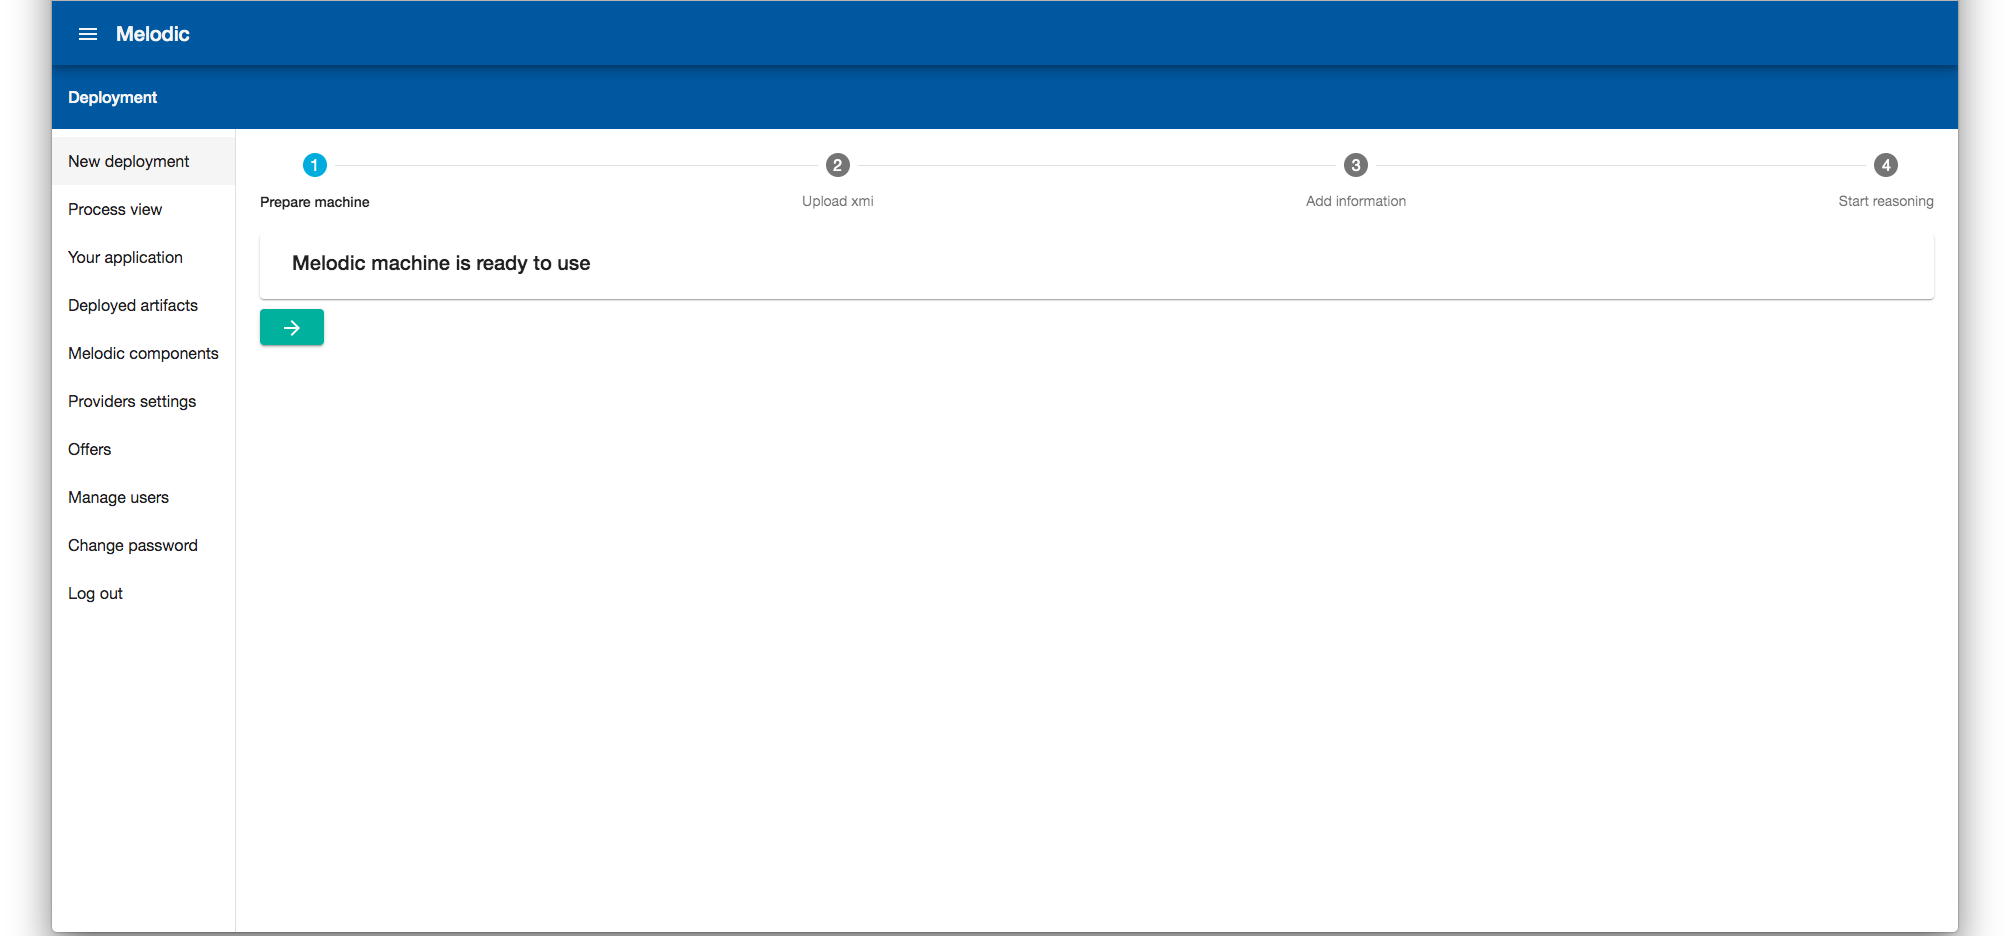
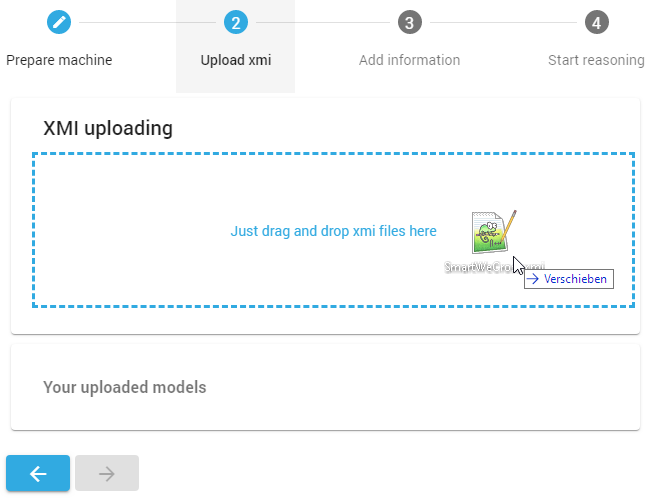
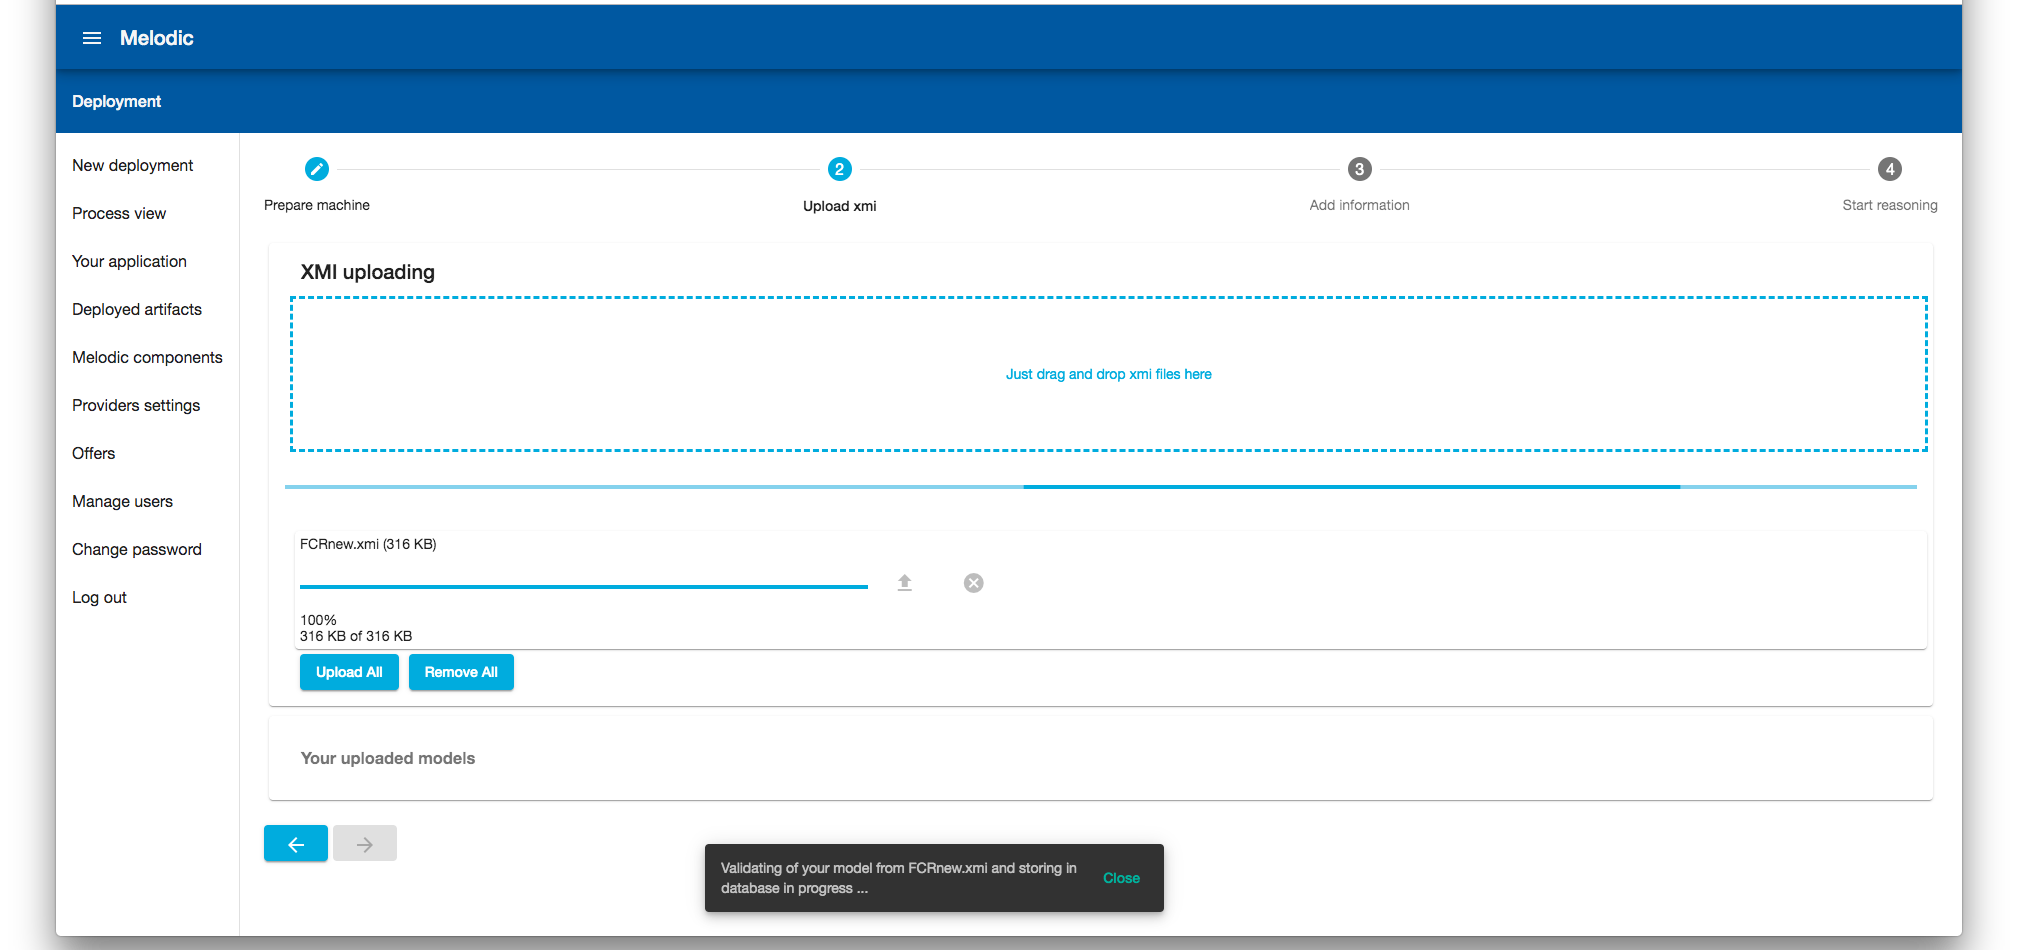
- Drag and drop downloaded CAMEL (.xmi) file and upload it to the CDO Repository
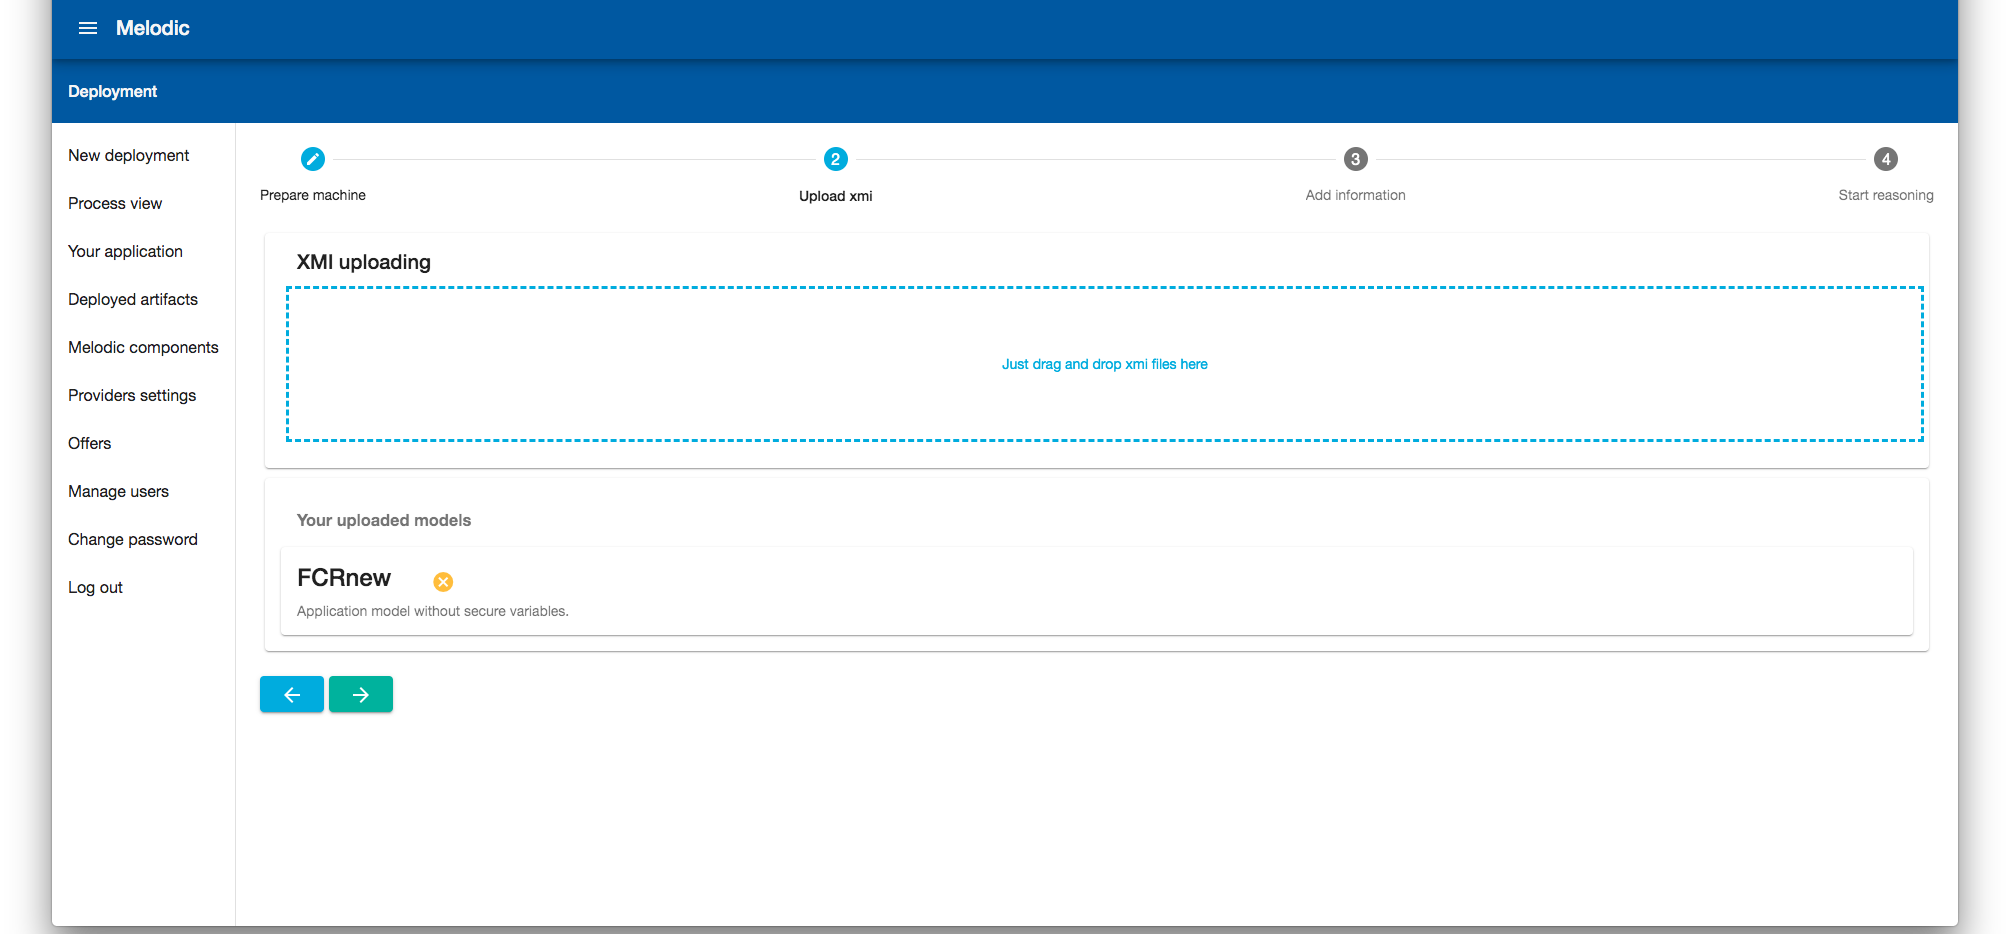
- When the CAMEL Model is uploaded, go to the next step.
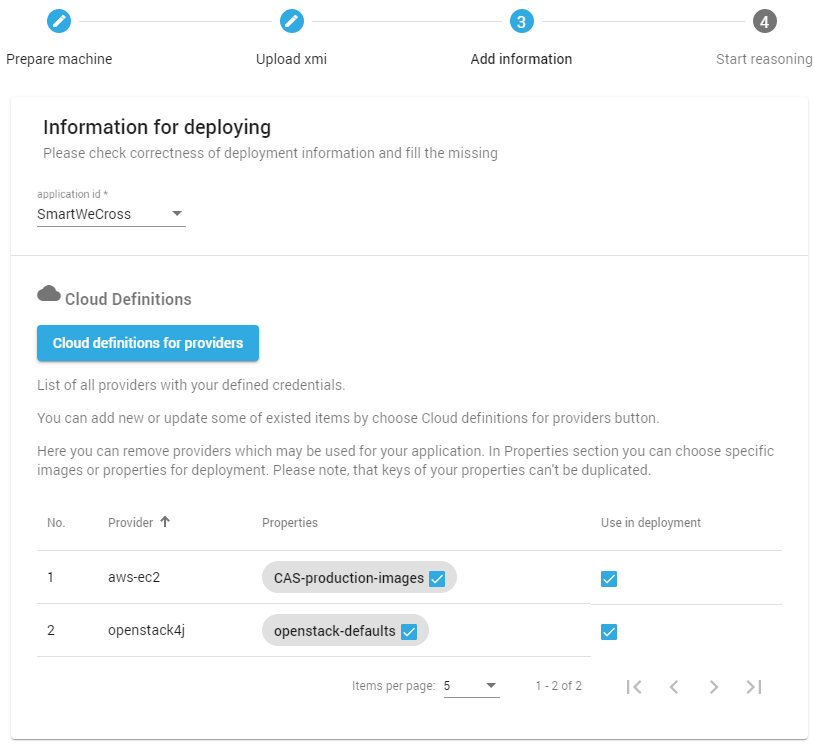
- Choose which application you want to deploy and which cloud providers you want to use.
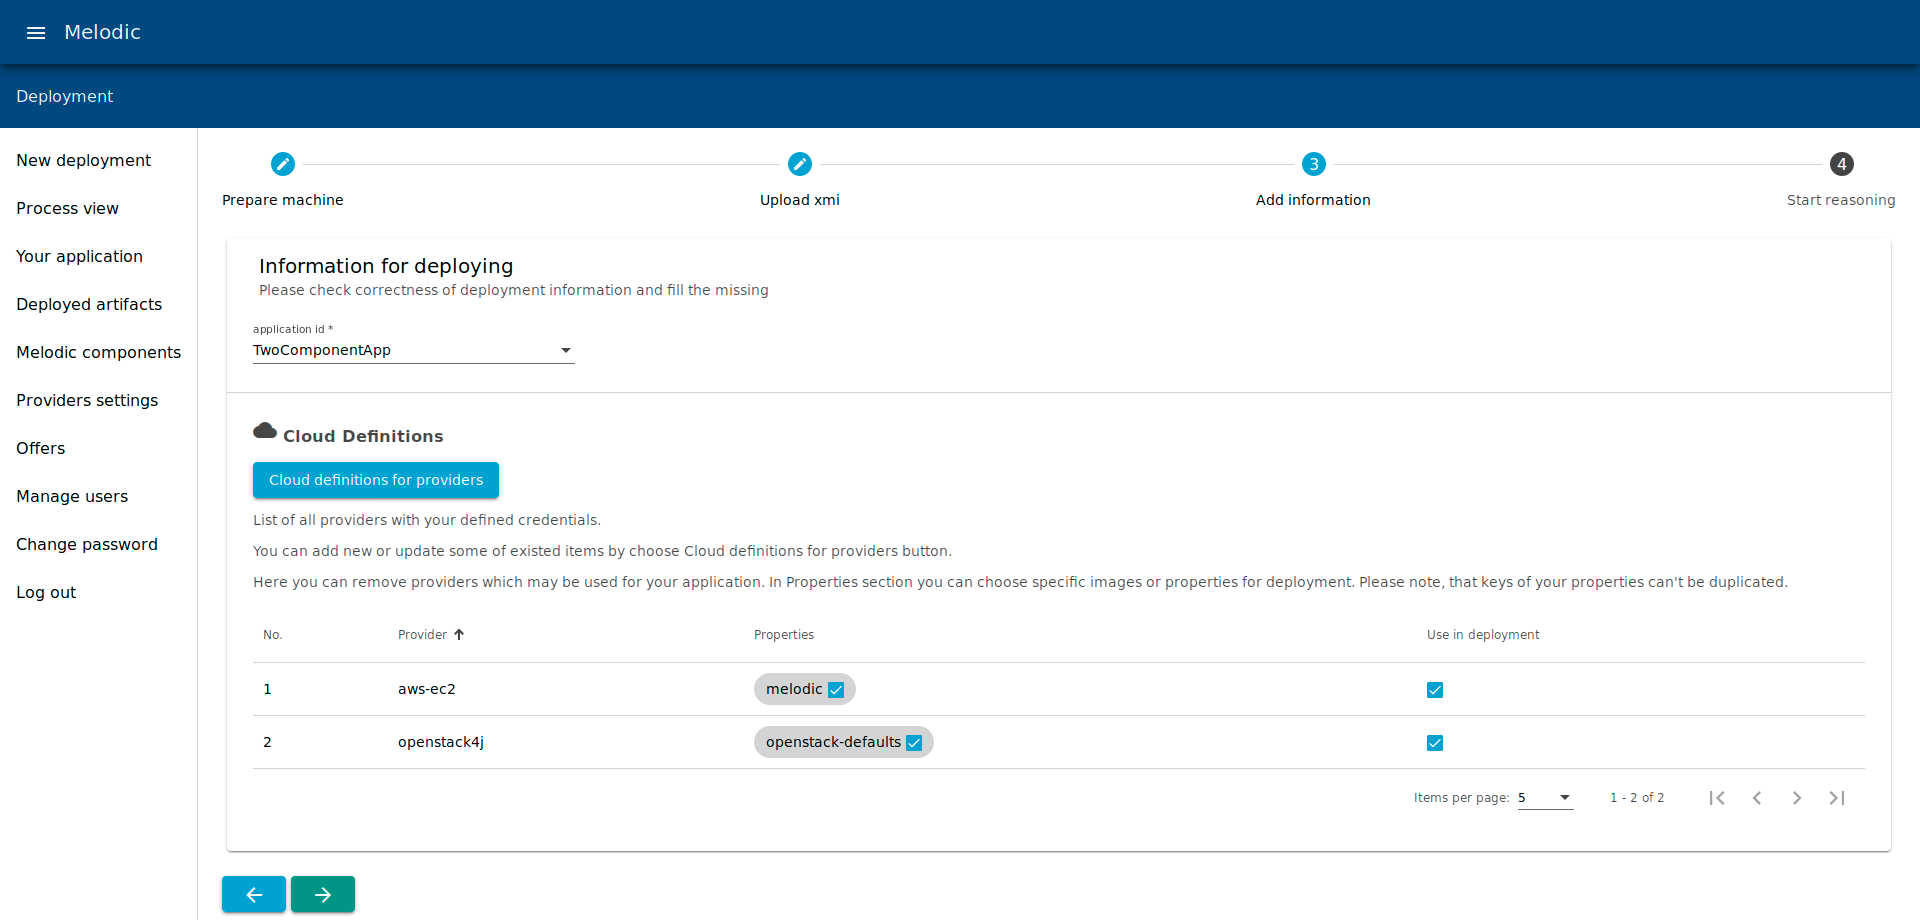
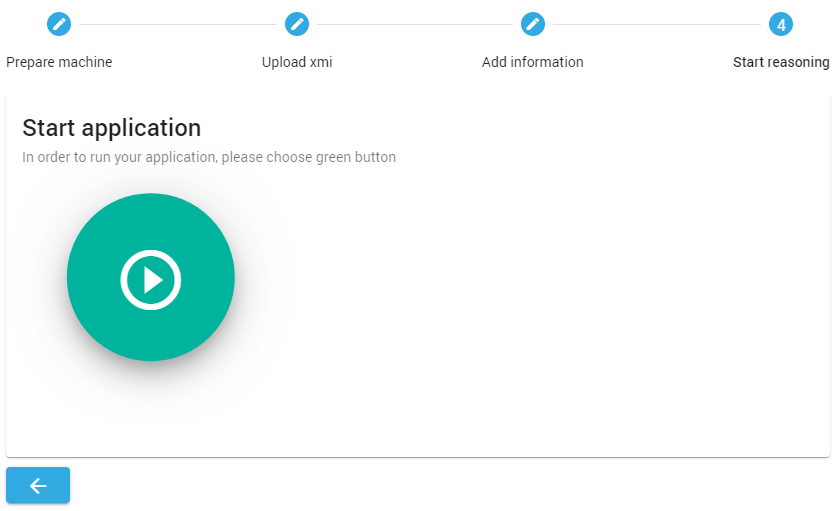
- Go to the next step and push the green button.
- In a minute, you will be moved to the deployment view, where you can observe the deployment process. If everything goes correctly, you should have the view similar to this:
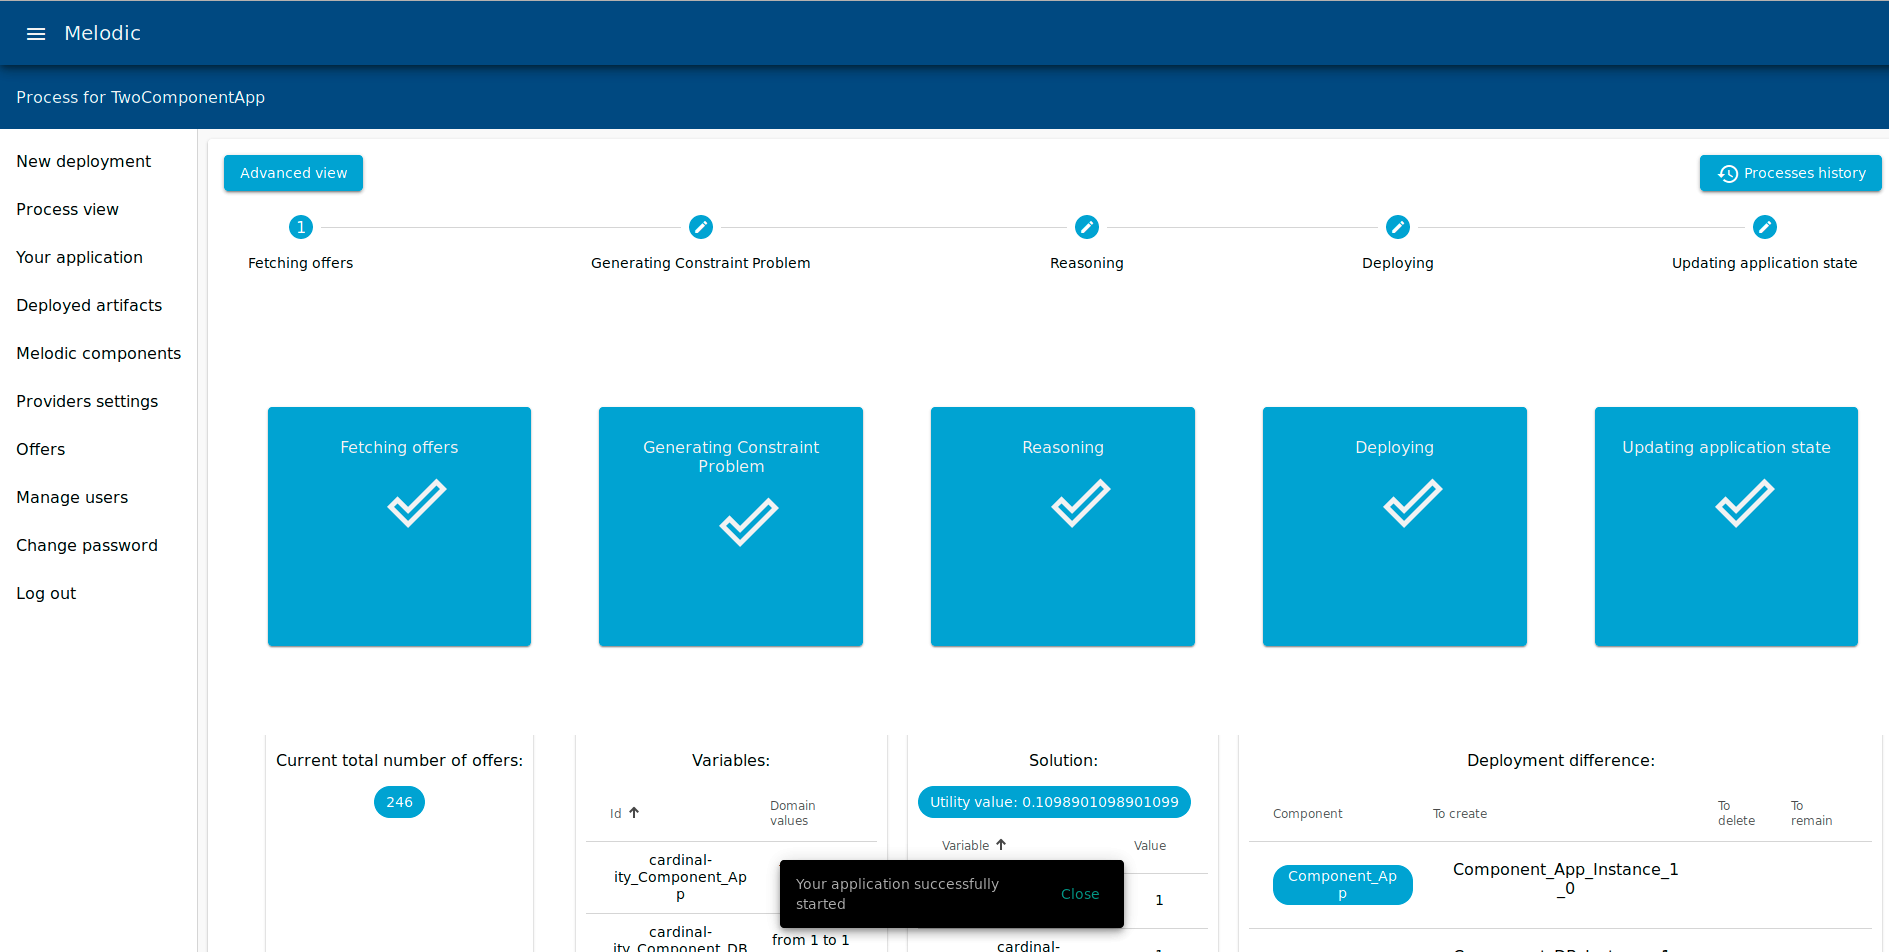
- If you want to have a more detailed view, it is possible to see the process view using Camunda on {{MELODIC-IP}}:8095 (login with your LDAP’s credentials)
- Please take a look if your instances have opened the necessary ports. For this basic example it is 3306 on the database and 3306 and 9999 on the application instance.
- When your application is deployed, you can check the result in the Your Application bookmark.
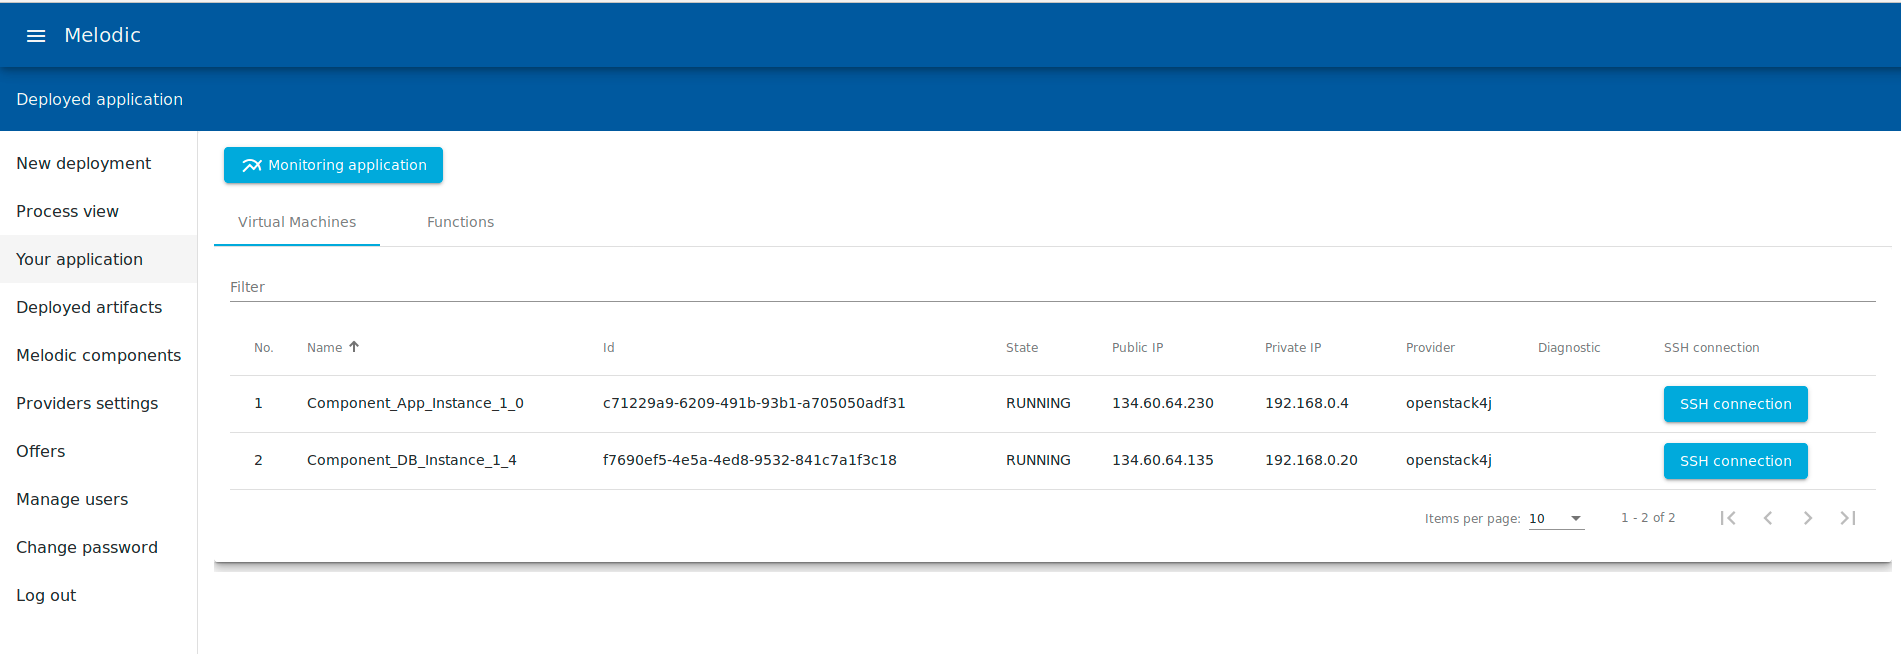
- Let’s do a simple test if application works properly: http://{{application-ip-host}}:9999/demo/all
- Save name and e-mail to the database http://{{application-ip-host}}:9999/demo/add?name=Name&email=email@melodic.com
- Check if it has been saved. http://{{application-ip-host}}:9999/demo/all
- Application works as expected.
Preparation of the Melodic machine after IP change
If you are not connected with the Melodic machine, open a terminal and login
ssh -i {{nameOfYourKey}} ubuntu@{{MELODIC-IP}}If your instance has a new IP, use command:
ipupdateRestart the Melodic using command:
drestartWait until or check if all components are ready. You can check the status of each component using command:
mpingIf your Melodic instance has a new IP, add GUI-backend self-signed certificate in your browser. Open https://{{MELODIC_IP}}:8078 and confirm the security exception.

- After that, you will see:

- Open MELODIC GUI: https://{{MELODIC_IP}}
- If your Melodic instance has a new IP, add GUI-frontend self-signed certificate in your browser by confirmation the security exception.
- Now your Melodic instance is ready for the deployment.
2c-2. Reconfiguration Management
Definition – What is reconfiguration
Reconfiguration is the process of modifying a multi-cloud application’s (current) deployment into a new one that better addresses application’s constraints and objectives, as they are captured in its CAMEL model
Initial Deployment vs. Reconfiguration
| Triggered by a user | Triggered automatically when certain conditions occur |
| Launches application by creating and starting its nodes | Adds new application nodes or removes not needed, without stopping application |
CAMEL Model elements that affect reconfiguration
- Requirements model:
- Optimisation Requirements: require maximization/minimization of certain metric variables
- Service Level Objectives (SLOs): they are related to constraints that require taking action when they are violated
- Constraints model:
- Metric Variable constraints: will require updating CP model with current metric variable values
- Metric model:
- Metric Variables: will require updating CP model with their current metric variable values
Metric model metrics also specify where and how application and Virtual Machine (VM) monitoring info is gathered (each type of metric is assign to a specific Monitoring hierarchy level, i.e. VM/Host, Cloud Zone/Region/Provider, Global)
Steps of reconfiguration
- Measurements are collected by sensors deployed in application VMs and components
- Measurements are sent to local EMS agent (called EMS client)
- EMS agent applies event processing rules (each measurement is an event) for Host/VM monitoring level
- EMS agent forwards events needed to higher monitoring levels to the appropriate EMS agent
- Intermediary EMS agent (if any) receive events from lower level EMS agents
- Intermediary EMS agent applies event processing rules for Cloud Zone/Region/Provider level
- Intermediary EMS agent forwards events needed to higher monitoring levels to the appropriate EMS agent
- EMS server (part of Melodic stack) receives events from lower level EMS agents
- EMS server applies event processing rules for Global monitoring level
- MetaSolver receives certain Global EMS agent event processing results:
- some are used to update application CP model with current metric values (can be composite, e.g. average execution time, max RAM usage)
- some are used to indicate that a constraint has been violated or a condition calling for application reconfiguration has occurred
- MetaSolver signals the Melodic stack’s Control process to start a new reconfiguration iteration
- Control process starts the Solving process (which solves a mathematical constraints problem to come up with a suitable application deployment)
- A CP problem solver is selected
- Solver solves the CP problem using the current metric values (those updated by MetaSolver with EMS info)
- New solution (corresponds to a new application deployment) is checked if its significantly better than current one (thus preventing pointless redeployments)
- Adapter finds the differences between current and new solution and realizes the necessary application VM deployments and undeployments
- In new deployments, apart from application components, sensors and EMS agent are also installed
- New VM EMS agents connect to EMS server and get their configuration
3-1. Introduction to CAS demonstrator
Environment
CAS Software AG
Founded in 1986, CAS Software became the german market leader for xRM software for small to mid size enterprises, a generic software allowing not only customer relationship management but any relationship management. CAS has a wide partner network, distributing and adapting the xRM software to customer and business sector needs. As especially small enterprises lack the infrastructure and experts for hosting the xRM system, CAS also developed a cloud solution for xRM called ‘SmartWe’. As the on-premise software, SmartWe allows customer-specific data types, forms and workflows to be developed in form of apps being part of the web application itself.
SmartWe
SmartWe (Link) is not only the software system itself but stands also for an ecosystem and a form of cooperative: the SmartWe World AG. Members of SmartWe World AG contribute to the ecosystem e.g. through marketing or development of apps. As customer needs in diverse business sectors are hard to grasp and generalize, SmartWe is developed as a generic platform with a sophisticated SDK (software development toolkit). With the SDK, development partners in the SmartWe World ecosystem are able to customize existing and develop new apps targeted to specific business sectors and customer needs.
The SmartWe platform and basic xRM solution is hosted in german datacenters, ensuring conformance to german data protection regulations. It consists of a set of standard xRM apps, a sophisticated search service, the SDK and an app store. Via the app store, customers can install additional apps to their web based SmartWe solution. With the help of Melodic, it´s possible to deploy different services on different infrastructures yet having on central monitoring and optimization. For example, the database can be hosted in an own managed infrastructure, whereas the client side can be deployed at Amazon in Germany and app providers can even bring their own nodes to let their application be hosted on a self-managed infrastructure, if desired. Each service´s requirements are described in one central Melodic model, having dedicated optimization and scalability rules allowing high performance while considering costs. By monitoring real time sensors, the services and data access are scaled up and down according to the actual usage of the component.
Demonstrator
The demonstrator of CAS Software AG bases on their CRM application ‘SmartWe’ with the following software components:
- HAProxy (Link) load balancer
- ‘SmartDesign’ frontend
- OPEN backend server
- MariaDB (Link)
- External application(s)
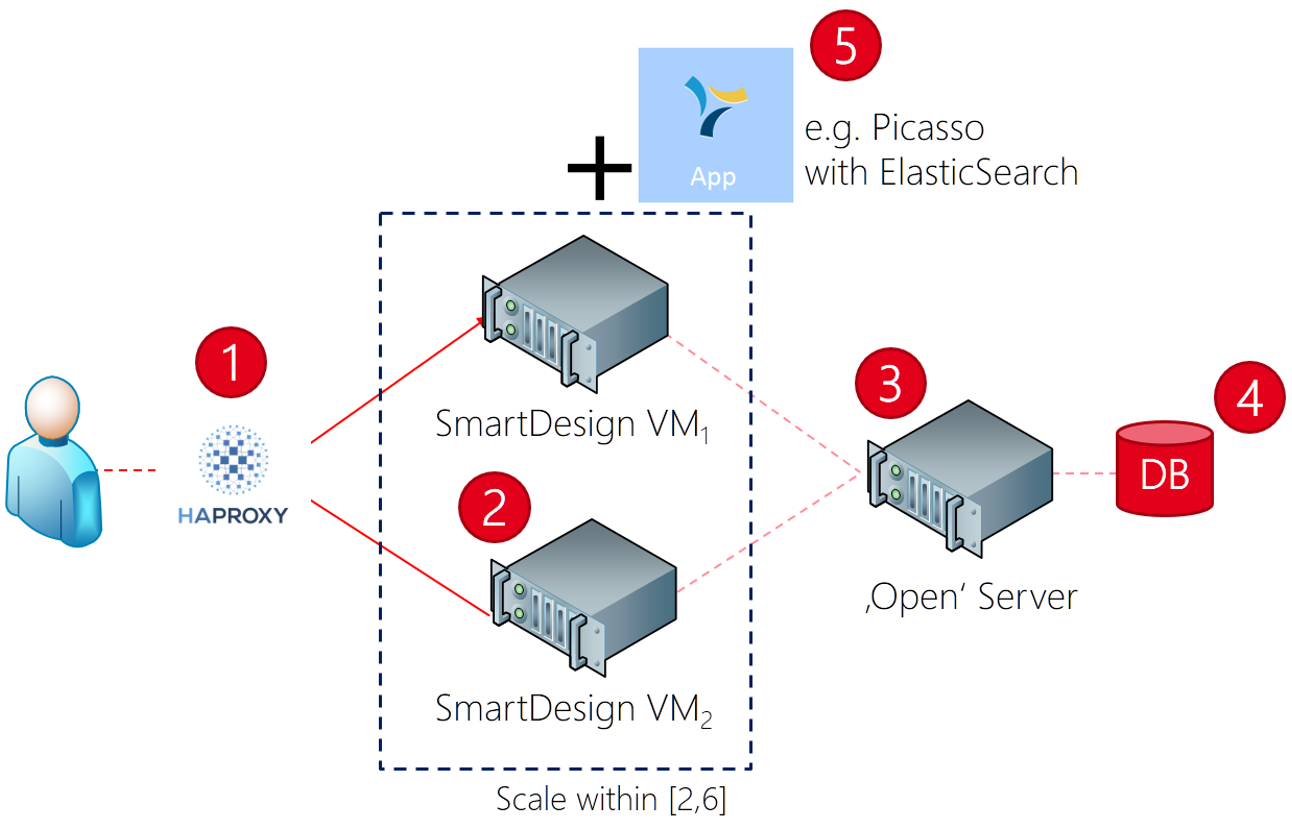
The CRM application with its components shall be automatically deployed with the MELODIC platform. All necessary steps from the platform setup to the actual application deployment and automatic optimizations are described in the following chapters.
Install Melodic
The installation of Melodic is performed on a virtual machine managed by the IT department and configured according to company standards (network, backup, administration access polcies, ..). Both the Melodic upperware and the executionware ‘Cloudiator’ (Link) are installed on the same host, what requires slightly more hardware resources as if both were installed on separate machines. The decision for a well-equipped machine also leaves room for future extensions. The Melodic machine at CAS Software AG has the following specifications:
| CPU Cores | 20 | Intel© Xeon, equivalent to 40 hyper threads |
| RAM | 60 GB | System has around 20% of free RAM |
| HDD | 100 GB | Around 30% are used, enough free space for docker images and logs |
| Operating System | Ubuntu 18.04 (LTS) | LTS version as reliable operating system |
Platform
Once the machine is ready, Melodic can be installed by checking out the project’s ‘util’ repository. It contains all the required installation scripts and allows – based on its branching model – the selection of a specific version. For the time being, R2.5 is the latest available release.
1 2 3 4 5 6 7 | # clone and checkoutgit clone https://bitbucket.7bulls.eu/scm/mel/utils.gitcd ~/utilsgit checkout rc2.5# setupsudo ~/utils/melodic_installation/installMelodic.sh |
The script first prepares the environment by installing Docker (Link) and then copies the initial Melodic configuration and docker-compose.yml files. The installation script has an average total execution time of around 2 minutes on the machine type (see description above) used within the demonstrator.
Configuration
Melodic comes as almost ‘zero configuration’ platform that detects required configuration settings automatically and without the necessity for manual adjustments. The only exception is the initial user that has to be added individually. While an LDAP user interface (e.g., ) can be used, a simpler way is to use the command line tool that comes with Melodic. It guides through the creation process and prompts for the required information (e.g., name and password).
1 2 | cd ~/utils/melodic_installation/./configureLdap.sh |
Once the LDAP user is added to the installed Melodic platform, a first platform start can be initiated. This can either be done for the upperware and the executionware separately by using the respective docker-compose.yml files, or by simply using the built-in commands Melodic is shipped with.
1 | drestart |
Verification
The installation can easily be verified by running the following built-in command:
1 | mping |
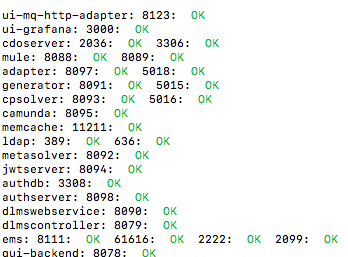
The command performs a local TCP port scan against the services the Melodic platform exposes. It gives a first hint on whether a service is generally available or not. Checks on application level have to be done apart if needed. A good indicator for the platform being up and running is the Melodic UI since it contacts different components to gather information about the system’s overall health.
Services
Of the aforementioned ports (see output of ‘mping’), only the Melodic UI frontend and backend have to be exposed for external access, e.g., via the intranet or the internet. In case of the CAS Software AG demonstrator, only the UI (including Grafana for virtualizations) and Active MQ are publicly accessible from a narrow range of source networks. While the UI is only accessible from within the company network, the Active MQ can be accessed in a secured manner from any source (deployments).
Monitoring
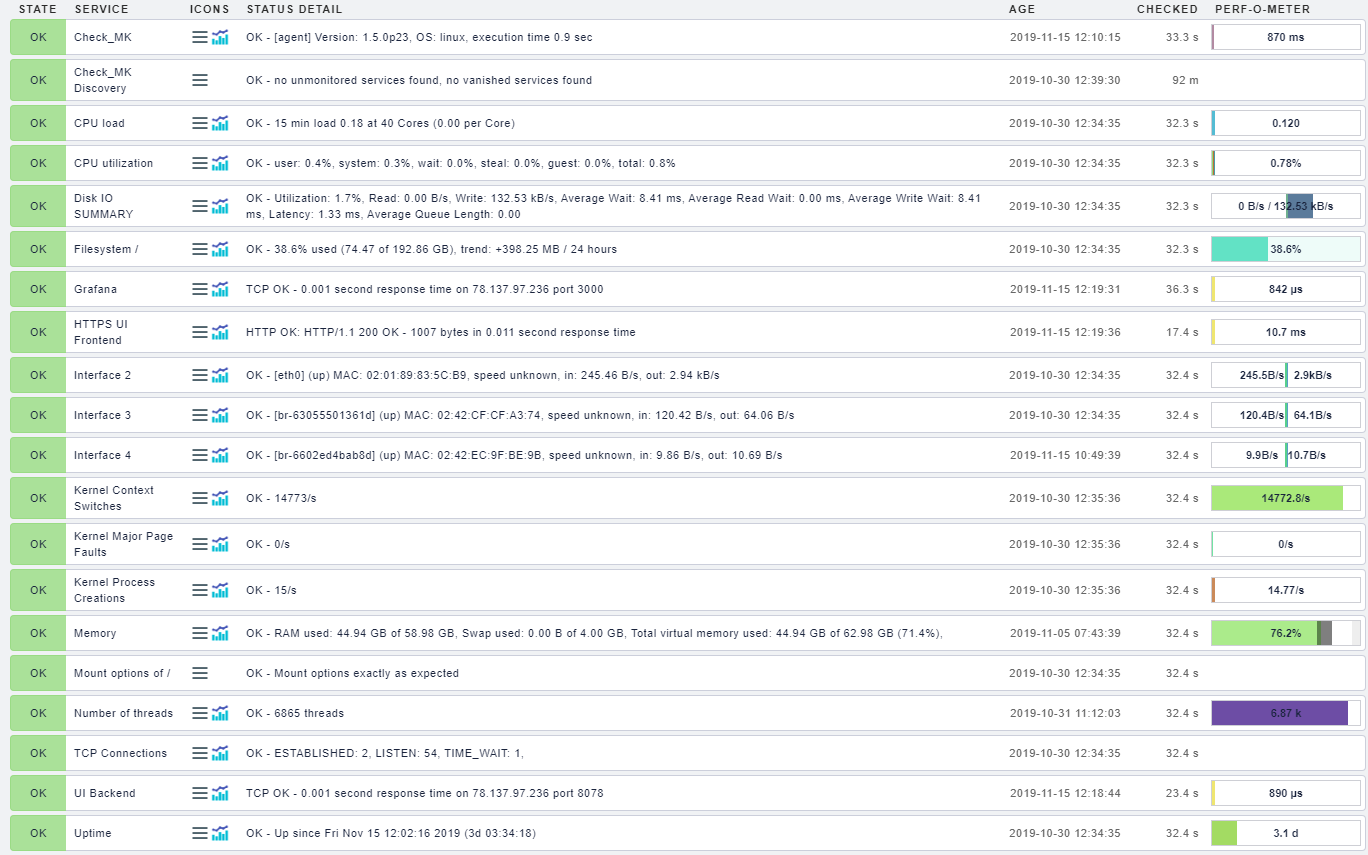
Melodic and its components are optionally monitored at CAS Software AG with the monitoring solution Check_MK (Link). It allows to monitor standard metrics such as the CPU load or the memory and can be extended by application-specific service checks. At CAS Software AG this was done for some Melodic components (e.g., UI frontend and backend, Grafana, Cloudiator REST API, message queue, ..). Once the state of a relevant Melodic component changes, a notification is sent out to the responsible DevOp.
Prepare Application
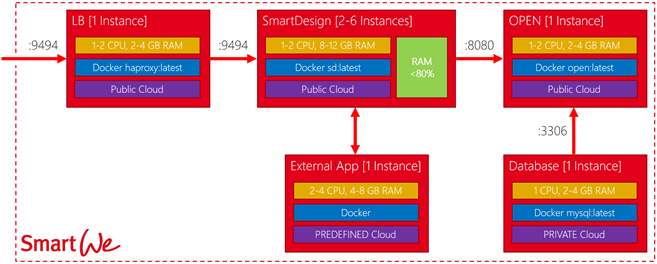
To allow Melodic the handling of an application, it first has to be modelled in CAMEL. Since every application comes with its own requirements and characteristics (e.g., installation, communication) it is recommended to start off with some conceptional work leading to the application model’s design. In case of SmartWe, the application components were first split up into separate components with clearly defined communication dependencies. The defined communication will later determine the deployment/initialization order of the application based on the dependencies that have to be resolved.
In a second step, meaningful requirements for each component are defined. These requirements stem from both experiments and observations from the conventional deployments before Melodic. Whether a public or private resource is required for a concrete component most certainly depends on company policies. In case of SmartWe, three deployment types were defined:
| public | Component that can be deployed on (almost) any public cloud resource such as Amazon AWS, Microsoft Azure |
| private | Component that must be deployed on a private resource such as a private OpenStack deployment (e.g., OMI Stack provided by UULM) |
| predefined | Refers to the bring-your-own-node (BYON) mechanism of Melodic, where a predefined machine is used to deploy a component |
Since all components of SmartWe now base on Docker containers, their respective images have to be defined. Since all components use custom images, an internal Docker registry is used. The credentials are provided as component parameters.
Modelling
The modelling in CAMEL of the application itself is explained in detail for the frontend component ‘SmartDesign’. As a first step, a ‘software’ entity named ‘SmartDesign’ is added to the yet empty model. Each line is explained with a comment directly in the following codeblock.
1 2 3 4 5 6 7 8 9 10 11 12 13 14 15 16 17 18 19 20 21 22 23 24 25 26 27 28 | software SmartDesign{ // reference to requiremens for this component requirements SmartDesignReqs // host entity the component will represent required host RequiredSmartDesignHost // port provided by component provided communication SmartDesignPort port 9494 // port required by component required communication OpenPortRequired port 8080 mandatory // configuration block script configuration SmartDesignConfiguration { // mode (here Docker) devops 'docker' // argument set, injected into the target host's environment feature SmartDesignDockerArguments { [MetaDataModel.MELODICMetadataSchema.ApplicationPlacementModel.PaaS.Environment.Container.Docker.DockerArguments] // auth against private docker registry attribute dockerUsername: string 'username $DOCKER_USER' attribute dockerPassword: string 'password $DOCKER_PASSWORD' // defines membership in 'dynamic group' used for application-specific load balancing attribute dynamicgroup: string 'dynamicgroup group1' } // Docker image attribute'$DOCKER_PRIV_REGISTRY:443/melodic/smartdesign:latest' } // defines component as 'long running' longLived} |
In the next step, the component requirements referenced from the previously explained ‘software’ entity are defined. Each requirements represents another reference to their prameterized requirement type in the global requirement model. Their meaning is explained by comments in the codeblock below.
1 2 3 4 5 6 7 8 9 10 11 12 | requirements SmartDesignReqs { // hardware resource definitions resource CRM_Requirement.SmartDesignResourceReqs // operating system os CRM_Requirement.UbuntuReq // horizontal scaling requirements horizontal scale CRM_Requirement.SmartDesignHScalingReq // resource type, e.g., public or private provider CRM_Requirement.PublicCloud // target has to be within Europe location CRM_Requirement.InEurope} |
The global requirement model contains the exact definitions for each requirement. The below codeblock shows its content for the ‘SmartDesign’ frontend component explained with inline comments.
1 2 3 4 5 6 7 8 9 10 11 12 13 14 15 16 17 18 19 20 21 22 23 24 25 26 27 28 29 30 31 32 33 34 35 36 37 38 39 40 41 42 43 44 45 | requirement model CRM_Requirement { // location requirement -> Europe location requirement InEurope [ GeoLocationModel.EU ] // private resource provider requirement PrivateCloud { cloud type private } // public resource (AWS, Azure etc.) provider requirement PublicCloud { cloud type public } // machine image, here Ubuntu image requirement Ubuntu18 ['ubuntu-18.04-amd64-server', 'ubuntu-1804'] // operating system type os requirement UbuntuReq{ os 'ubuntu' 64os } // hardware resources, such as CPU and RAM resource requirement SmartDesignResourceReqs{ feature hardware { [MetaDataModel.MELODICMetadataSchema.ApplicationPlacementModel.IaaS.Processing.CPU] attribute mincores [MetaDataModel.MELODICMetadataSchema.ApplicationPlacementModel.IaaS.Processing.CPU.hasMinNumberofCores] : double 1.0 UnitTemplateCamelModel.UnitTemplateModel.Cores attribute maxcores [MetaDataModel.MELODICMetadataSchema.ApplicationPlacementModel.IaaS.Processing.CPU.hasMaxNumberofCores] : double 2.0 UnitTemplateCamelModel.UnitTemplateModel.Cores attribute minram [MetaDataModel.MELODICMetadataSchema.ApplicationPlacementModel.IaaS.Processing.RAM.TotalMemory.totalMemoryHasMin] : int 8000 UnitTemplateCamelModel.UnitTemplateModel.MegaBytes attribute maxram [MetaDataModel.MELODICMetadataSchema.ApplicationPlacementModel.IaaS.Processing.RAM.TotalMemory.totalMemoryHasMax] : int 12000 UnitTemplateCamelModel.UnitTemplateModel.MegaBytes } } // SLO defining when to optimize the deployment (e.g., scaling) slo AvgMemoryUtilisationSLO constraint CRMConstraintModel.AvgMemoryUtilisationLessThan80 // scaling window, min and max instances horizontal scale requirement SmartDesignHScalingReq [2,6] // utility function reference --> evaluated whenever a machine/deployment is needed optimisation requirement maxCostUtility{ variable CRMMetricModel.CostUtility } } |
To fully support efficient reasoning, a utility function is defined that optimizes for cost (e.g., find the cheapest possible solution). The closer to ‘1’, the more efficient the solution is. For the ‘SmartWe’ demonstrator, the cost of a ‘SmartDesign’ frontend component multiplied by the cardinality is used as denominator.
1 2 3 4 5 | variable CostUtility{ template MetricTemplateCamelModel.MetricTemplateModel.UtilityTemplate component CRMDepModel.SmartDesign formula: ('1/(SmartDesignUnaryCost * SmartDesignCardinality)')} |
A constraing representing the SLO that initiates an optimization is defined based on the average overall system RAM being always below 90%. Once the 90% are crossed towards higher values, the SLO is fired by the EMS causing Melodic to start another reasoning process in order to find a ‘better’ deployment situation. In case of the demonstrator this leads to adding another instance of the ‘SmartDesign’ frontend (due to considering the cardinality in the utility function). Generally it could also be an option to replace the existing deployments with one done on a bigger machine type.
1 2 3 4 | constraint model CRMConstraintModel{ metric constraint AvgMemoryUtilisationLessThan80: [CRMMetricModel.AvgMemoryUtilisationContext] > 90.0 variable constraint SmartDesignRAMConstraint: CRMMetricModel.SmartDesignRAMConstraintFormula < 0.0} |
Secure Operation and Deployment
After having the CAMEL application model ready, some additional security is added by creating XACML rules that are then added to the Melodic authorization mechanism. Based on some internal considerations, the following must be enforced before any deployment is made:
| Deployment in ‘DE’ | based on internal company policy and the compliance with aspects of the GDPR, a deployment must happen onto a target machine located in Germany |
| Deployment during working hours | in the beginning, deployments (including optimizations → scaling) must happen only within the company’s working hours |
The codeblock below shows the XACML-based representation of the two described security rules. Over the whole policy, standard XACML is used that could be extended at any time if necessary. The file itself is stored in the ‘~/conf/policies’ folder and automatically loaded by the authorization mechanism during runtime.
1 2 3 4 5 6 7 8 9 10 11 12 13 14 15 16 17 18 19 20 21 22 23 24 25 26 27 28 29 30 31 32 33 34 35 36 37 38 39 40 41 42 43 44 45 46 47 48 49 50 51 52 53 54 55 56 57 58 59 60 61 62 63 64 65 66 67 68 69 70 71 72 73 74 75 76 77 78 79 80 81 82 83 84 85 86 87 88 89 90 91 92 93 94 | <?xml version="1.0" encoding="UTF-8"?><xacml3:Policy xmlns:xacml3="urn:oasis:names:tc:xacml:3.0:core:schema:wd-17" PolicyId="TC-AC-07+08+09" RuleCombiningAlgId="urn:oasis:names:tc:xacml:1.0:rule-combining-algorithm:first-applicable" Version="1.0"> <xacml3:Description> Sample policy for CAS use case: - VM deployments only within Europe or DE - VM deployments only during working days (= Monday-Friday) and between 08:00 and 17:00 CET </xacml3:Description> <xacml3:Target> <xacml3:AnyOf> <xacml3:AllOf> <xacml3:Match MatchId="urn:oasis:names:tc:xacml:1.0:function:string-equal"> <xacml3:AttributeValue DataType="http://www.w3.org/2001/XMLSchema#string">Adapter</xacml3:AttributeValue> <xacml3:AttributeDesignator AttributeId="user.identifier" Category="urn:oasis:names:tc:xacml:1.0:subject-category:access-subject" DataType="http://www.w3.org/2001/XMLSchema#string" MustBePresent="true"/> </xacml3:Match> <xacml3:Match MatchId="urn:oasis:names:tc:xacml:1.0:function:string-equal"> <xacml3:AttributeValue DataType="http://www.w3.org/2001/XMLSchema#string">DEPLOY</xacml3:AttributeValue> <xacml3:AttributeDesignator AttributeId="actionId" Category="urn:oasis:names:tc:xacml:3.0:attribute-category:action" DataType="http://www.w3.org/2001/XMLSchema#string" MustBePresent="true"/> </xacml3:Match> </xacml3:AllOf> </xacml3:AnyOf> </xacml3:Target> <xacml3:Rule Effect="Permit" RuleId="Rule-000000"> <xacml3:Condition> <xacml3:Apply FunctionId="urn:oasis:names:tc:xacml:1.0:function:and"> <xacml3:Apply FunctionId="urn:oasis:names:tc:xacml:1.0:function:integer-equal"> <xacml3:Apply FunctionId="urn:oasis:names:tc:xacml:1.0:function:string-bag-size" > <xacml3:AttributeDesignator AttributeId="all-vm-countries" Category="urn:oasis:names:tc:xacml:3.0:attribute-category:environment" MustBePresent="true" /> </xacml3:Apply> <xacml3:AttributeValue DataType="http://www.w3.org/2001/XMLSchema#integer">1</xacml3:AttributeValue> </xacml3:Apply> <xacml3:Apply FunctionId="urn:oasis:names:tc:xacml:1.0:function:string-equal"> <xacml3:Apply FunctionId="urn:oasis:names:tc:xacml:1.0:function:string-one-and-only"> <xacml3:AttributeDesignator AttributeId="all-vm-countries" Category="urn:oasis:names:tc:xacml:3.0:attribute-category:environment" MustBePresent="true" /> </xacml3:Apply> <xacml3:AttributeValue DataType="http://www.w3.org/2001/XMLSchema#string">DE</xacml3:AttributeValue> </xacml3:Apply> <xacml3:Apply FunctionId="urn:oasis:names:tc:xacml:1.0:function:string-at-least-one-member-of"> <xacml3:Apply FunctionId="urn:oasis:names:tc:xacml:1.0:function:string-bag"> <xacml3:AttributeValue DataType="http://www.w3.org/2001/XMLSchema#string">Monday</xacml3:AttributeValue> <xacml3:AttributeValue DataType="http://www.w3.org/2001/XMLSchema#string">Tuesday</xacml3:AttributeValue> <xacml3:AttributeValue DataType="http://www.w3.org/2001/XMLSchema#string">Wednesday</xacml3:AttributeValue> <xacml3:AttributeValue DataType="http://www.w3.org/2001/XMLSchema#string">Thursday</xacml3:AttributeValue> <xacml3:AttributeValue DataType="http://www.w3.org/2001/XMLSchema#string">Friday</xacml3:AttributeValue> </xacml3:Apply> <xacml3:AttributeDesignator AttributeId="current-weekday" Category="urn:oasis:names:tc:xacml:3.0:attribute-category:environment" MustBePresent="true" /> </xacml3:Apply> <xacml3:Apply FunctionId="urn:oasis:names:tc:xacml:2.0:function:time-in-range"> <xacml3:Apply FunctionId="urn:oasis:names:tc:xacml:1.0:function:time-one-and-only" > <xacml3:AttributeDesignator AttributeId="urn:oasis:names:tc:xacml:1.0:environment:current-time" Category="urn:oasis:names:tc:xacml:3.0:attribute-category:environment" MustBePresent="true" /> </xacml3:Apply> <xacml3:AttributeValue DataType="http://www.w3.org/2001/XMLSchema#time">08:00:00+01:00</xacml3:AttributeValue> <xacml3:AttributeValue DataType="http://www.w3.org/2001/XMLSchema#time">17:00:00+01:00</xacml3:AttributeValue> </xacml3:Apply> </xacml3:Apply> </xacml3:Condition> </xacml3:Rule> <xacml3:Rule Effect="Deny" RuleId="Deny-Rule"/></xacml3:Policy> |
Deploy Application
With the CAMEL application model and the security policies ready, the initial deployment itself can be performed. To ensure a running Melodic platform with all components up and ready, the ‘mping‘ command can be used a last time. After verifying that all components show the status ‘OK‘, the Melodic UI can be opened in the browser. The credentials of the initial LDAP user are used for the login.
Provider Settings
In case of the CAS Software AG demonstrator around ‘SmartWe’, two providers are configured where one of these represent a public and the other a private cloud resource. The UI menu ‘Provider Settings’ is used to navigate to the provider overview, where “+ Add” is used to configure a new provider.
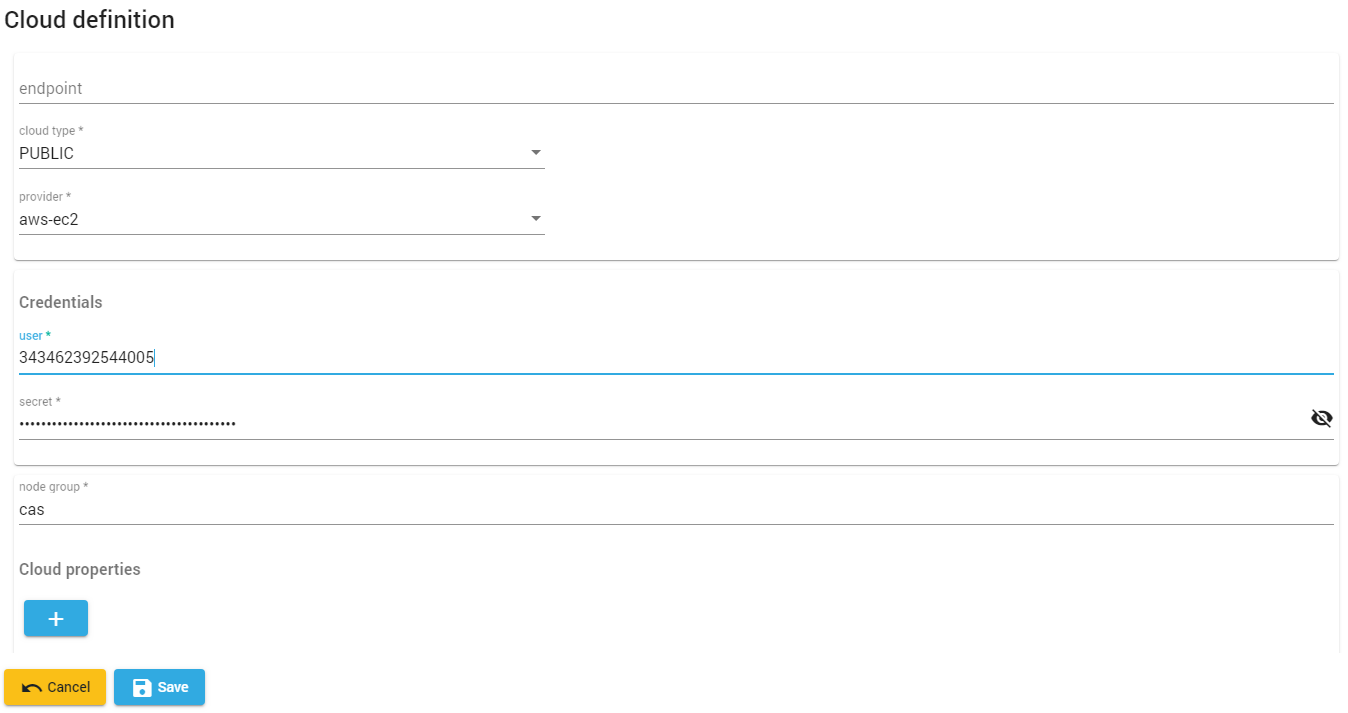
In case of the Amazon AWS public cloud, settings are made accordingly. The provider preset ‘aws-ec2’ can directly be choosen from a dropdown list, since its connectors are already contained in Melodic. Other provider presets (e.g., Azure, GCP) are available as well. Crucial for the provider setting are the credentials. In case of AWS a ‘user’ and a ‘secret’ are provided in the respective input fields. The credentials are stored securely in a component named ‘secure variable store’.
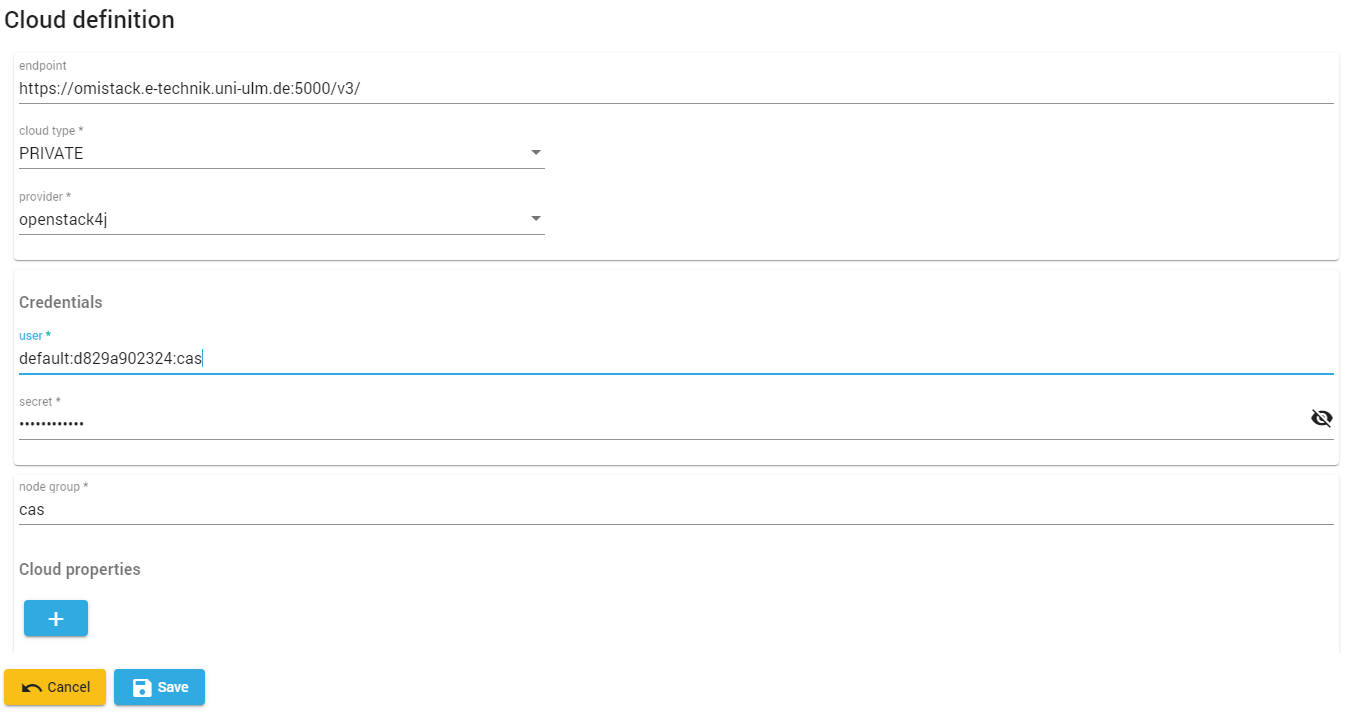
The same procedure is repated for the OpenStack private cloud. Here, a specific endpoint has to be provided whereas the Amazon AWS configuration did not require one due to being a publicly accessible under a unified, single URL. The ‘user’ as part of the credentials is derived from an installation (default), a project identifier (d829a..) and a concrete user (cas). The ‘node group’ is set to ‘cas’ what allows for an easy identification once the component is deployed. With most providers, Melodic will use the node group as part of the instance name.
The existance of cloud providers can easily be checked on the ‘Provider Settings’ page of the Melodic UI.

Deployment
Once the providers are setup and ready to be used, the deployment itself can be initiated. Under the “New Deployment” menu on the Melodic UI the user will find a wizard that prompts for the required information. The steps are as follows:
| Upload CAMEL Model |
| The first step of a new deployment is always to provide the application model. Based on said model and the contained requirements a deployment onto suitable targets is performed. |
| Check Cloud Providers |
| The previously configured cloud providers can now be selected for the new deployment. In case of the demonstrator, both (public and private) providers are selected. |
| Start Deployment |
| Final wizard page that allows to actually run the deployment. |
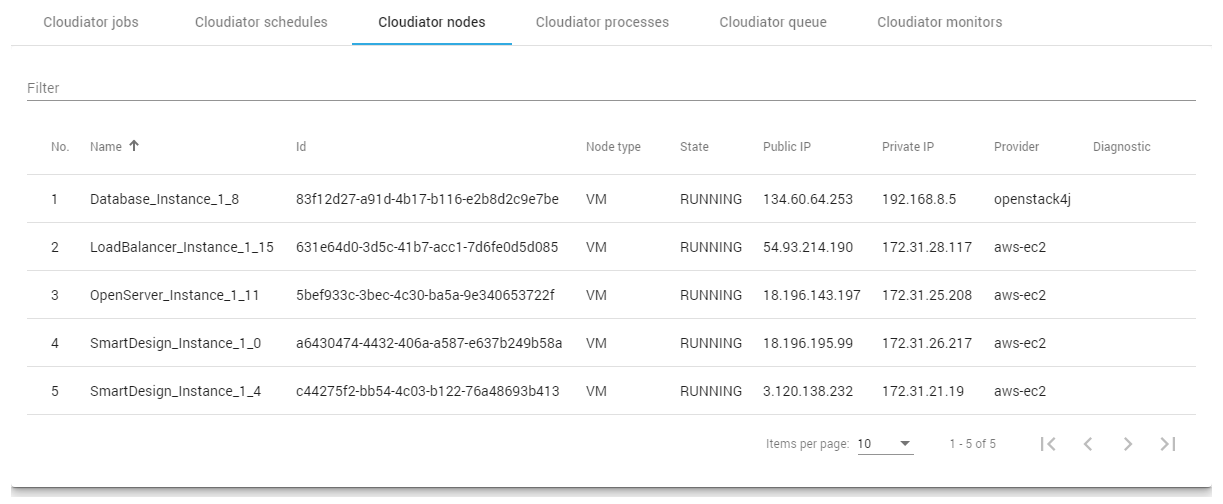
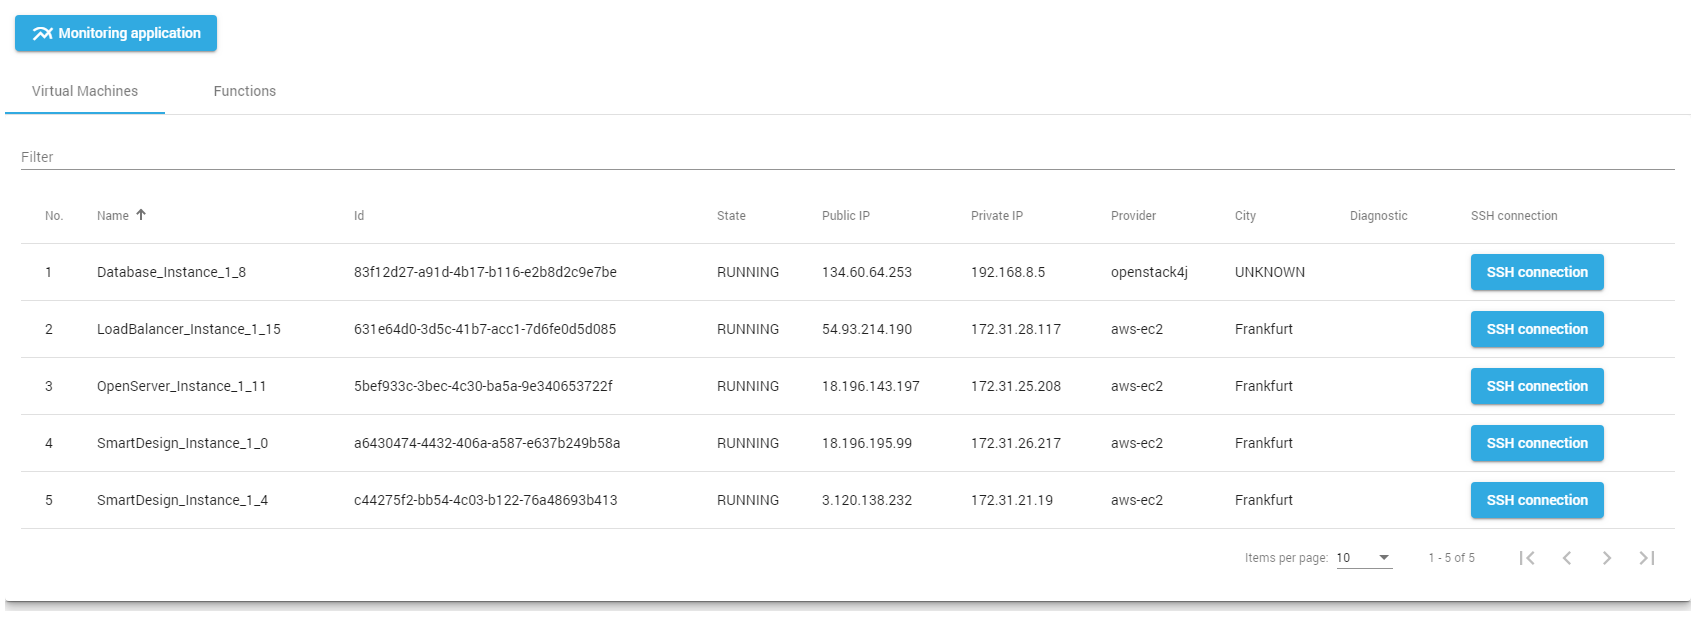
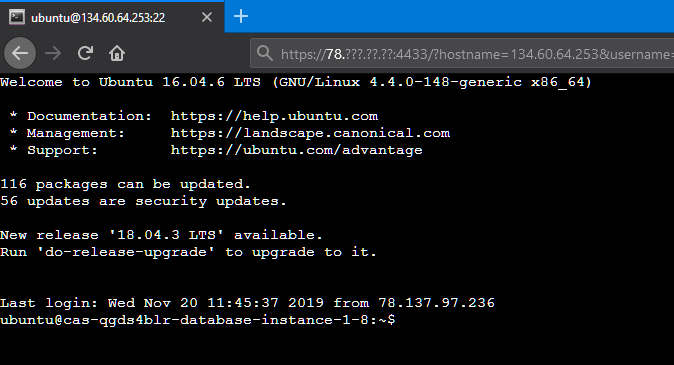
Once the deployment is successfully done, the deployment can be inspected by navigating to the Melodic UI menu ‘Deployed Artifacts’. Besides technical details about the underlying Cloudiator ‘Jobs’, ‘Schedules’ and ‘Processes’ there is a view for the allocated nodes. It shows information about the application component instances and their IP addresses. A similar view is offered within the menu ‘Your Application’ with a stronger emphasis on direct interaction with the machines. For development purposes, the SSH connection feature can be used to directly connect to the machine’s host OS.
Warning
The SSH connection feature currently exposes the machine’s private key in the browser address bar. We therefore recommend to use this feature only during development, evaluation and debugging.
Node View |
| Shows information about the nodes that were selected during the reasoning process as part of the deployment. |
| ‘Your Application’ View |
| More interactive view on deployed nodes with ‘SSH Connection’ functionality. |
| SSH Connection to machine |
| Opens an SSH connection usable throughout the browser. |
Apart of the built-in possibilities of checking deployments it is of course always practical (especially during the development tests) to visit the cloud providers management UIs. The screenshot below shows the AWS ‘EC2 Management Console’ with all public components of ‘SmartWe’ successfully deployed and running. Checking the management console is especially useful if provider-specific tools (e.g., billing details, detailled checks) are needed. If only basic information is required, the Melodic UI alone should be sufficient since it queries the cloud provider for some of its data.

Visualization
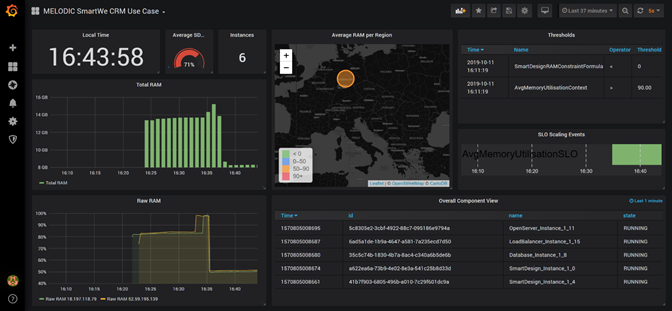
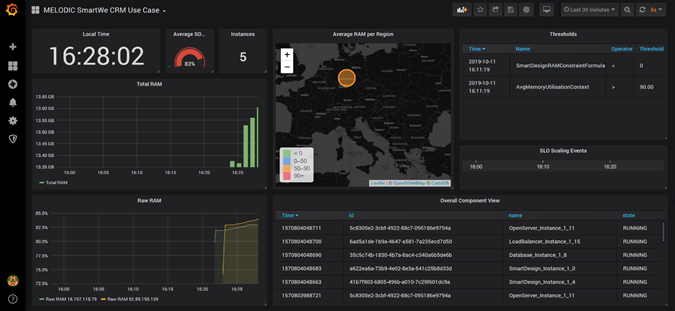
Metrics produced by the Melodic sensors and the EMS are a useful tool when it comes to monitoring the health status of the overall application and its components. Depending on the sensors defined in the CAMEL application model, the respective values can be analysed and used within dashboards with Grafana. The required environment is installed as part of the Melodic platform and can be accessed under port 3000. For the demonstator, a meaningful dashboard was designed based on the available sensor metrics (RAM usage) and generally available meta information (nodes, SLO variables like thresholds).
Optimization/Reconfiguration
Based on the modelled constraint (see above) Melodic initiates an optimization of an existing deployment whenever the SLO is fired. To test the rules and the underlying mechanism it turned out to be good practise to provoke related system states with the Linux tool ‘stress’. On the ‘SmartDesign’ instances RAM usage was forced to certain levels (>90%). A script was written for that purpose allowing to pass the targetted RAM usage as parameter. The target values are not very precise and should only be seen as an estimation.
1 2 3 4 5 6 7 8 9 10 11 12 13 14 15 16 17 18 19 | #!/bin/bashtotal=$(free | awk '{print $2}'| head -2| tail -1); echo "Free:"$total;used=$(free | awk '{print $3}'| head -2| tail -1); echo "Used:"$used;avail=$(free | awk '{print $7}'| head -2| tail -1); echo "Avail"$avail;target=$((total / 100 * $1));echo "Targeted:"$target;target_n=$((target - used));target_m=$((target_n/1000))echo "Targeted_MB:"$target_mif [[ $target_m =~ ^[\-0-9]+$ ]] && (( $target_m > 0)); then stress --vm-bytes "$target_m"M --vm-keep -m 1else echo "Memory load already higher than "$1"%"fi |
As a result of the optimization, another instance of ‘SmartDesign’ is added and registered at the load balancer. The screenshot below shows the Grafana dashboard shortly after an optimization was done. The ‘Instance’ indicator increased from 5 to 6 and an SLO event is logged in the “SLO Scaling Event” graph. As for the initial deployment the already described ways of checking a deployment (e.g., ‘Your Application’ view, cloud provider management console) can be exploited to check the optimized deployment situation.
